Wednesday, November 30, 2011

Sausage and Potato Breakfast Casserole

Breakfast is my favorite meal, usually because by the time I wake up, I am ravenous and anything I find to eat is going to taste delicious. It is a rare day that I skip breakfast, and I usually enjoy a substantial meal in the morning rather than a few bites of something light. I'd rather have eggs and potatoes for breakfast than something sweet and fruity, although the occasional plate of waffles and syrup suits me fine. In general, give me something packed with protein, carbs, cheese and sometimes a bit of grease, and I'm satisfied for hours.

I also love one-dish meals, with everything mixed together - easy to make, easy to serve and totally delicious. This breakfast casserole is very forgiving because you can toss in a variety of vegetables - I often include sauteed mushrooms and green pepper. You can use 2 cups of egg substitute in lieu of the whole eggs, and frozen hash browns work in a pinch if you don't happen to have any leftover baked potatoes. Use whichever sausage you like best, maple breakfast sausage, a spicy chorizo, or my favorite, a bulk pork sausage heavy on the sage.

Any way you cut it, it's a deeply satisfying dish and a great breakfast for those days you need something solid in your stomach.


Sausage and Potato Breakfast Casserole


Ingredients
  • 1/2 lb. bulk pork sausage - I like Bob Evans Savory Sage sausage
  • 1/2 medium onion, choppped
  • 2 large russet potatoes, baked*
  • 1 cup extra-sharp cheddar, shredded
  • 8 eggs**
  • 1/4 cup milk
  • pinch salt
  • pinch pepper
 Directions
  1. Preheat the oven to 350 F and grease an 8 in. x 8 in. baking dish.

  2. Brown the sausage in a large skillet until browned. Break up any large clumps of sausage. Add the chopped onion when the sausage is mostly cooked through and cook until the onion has softened and all the pink is gone from the sausage.

  3. Shred the leftover baked potatoes with a box grater into a large bowl and beat together the eggs and milk in another bowl or a measuring cup.

  4. Layer half the shredded potatoes in the baking dish, followed by half of the sausage and onion mixture and then half of the cheese and repeat with the remaining potatoes, sausage and onion and cheese.

  5. Season with salt and pepper

  6. Pour the egg-and-milk mixture evenly over the other ingredients and bake for 40 - 50 minutes or until the eggs are set. You can bake it longer if you want it to come out golden brown.

  7. Let cool 5 minutes and then serve. I added a bit of sriracha on mine.

Tuesday, November 29, 2011

Caramelized Onion and Goat Cheese Tart

I am back to creating dishes by throwing together the leftover bits and pieces from other meals. I hate throwing away perfectly good food, and do it more often than I would like, despite the fact that I have been reducing recipes several times over to yield smaller amounts.

I have been challenging myself to find new and exciting ways to repurpose leftovers. I almost always have a box of puff pastry in the freezer, and really I think that just about anything can be gussied up by wrapping it in puff pastry or presented as a tart. Slap some cheese on it, garnish with a sprinkling of fresh herbs or a drizzle of some sort of sauce and presto, you've got "something fancy for supper," which is something that my kids are really big into at the moment.

They don't have to know that those are the leftover caramelized onions from the French Onion soup 2 weeks ago that I froze. All they know is that it looks nice and tastes delicious.


Caramelized Onion and Goat Cheese Tart

Makes 2 small tarts


Ingredients
  • 1 oz. herbed goat cheese
  • 1 sheet puff pastry, thawed*
  • 1/2 cup caramelized onions
  • 2 strips bacon, cooked and crumbled
  • 1/2 cup Emmenthaler cheese, shredded
Directions:
  1. Preheat the oven to 375. Cut two 6 inch rounds out of thawed puff pastry and press them into 5 inch tart molds.

  2. Break the goat cheese into pieces and add them to the pastry shells.

  3. Divide the caramelized onions between the two shells and top with shredded Emmenthaler and crumbled bacon.

  4. Bake for 20 - 25 minutes or until the edges of the shells have puffed up and browned.

  5. Let cool 5 minutes and then serve.

Notes:

  • One sheet of puff pastry yielded 4 rounds, and some scraps, but I only made use two of the rounds for these  caramelized onion and goat cheese tarts. I used the other two rounds to make ham and cheese tarts, recipe coming soon. 
  • I will put the puff pastry scraps to use soon, most likely as a dessert or a snack. 

Wednesday, November 23, 2011

Cheese Parathas

I needed a last-minute lunch before I had to hit the road to leave for our Thanksgiving road trip, so I settled on 2 cheese parathas. Quick, easy, tasty.


Parathas are very easy to put together and cook; you'll be done before you know it. It took me longer to get my camera set up and take these pictures than it did to make and cook the parathas from start to finish.

Parathas are an unleavened whole wheat Indian flatbread, often stuffed with some sort of spiced deliciousness. My favorites are the potato-stuffed parathas (Aloo Paratha) and cheese-filled parathas (Paneer Paratha), but you can find them stuffed with cooked, mashed cauliflower, and probably a variety of other ingredients.

When I came across this video from Manjula's Kitchen, I knew I wanted to try making the parathas her way. She made it look effortless and tasty. No doubt she has years of working that tiny rolling pin under her belt, and although I did a pretty good job of filling and rolling my parathas, they were not as thin and lovely as hers are.

Like so many other things, it just takes practice.


I wanted cheese parathas, but I didn't have paneer or plain yogurt, or even cilantro. I had to fudge the filling a bit to use what I had on hand, but I think that it worked out fine.  I also reduced the recipe quite a bit to make just 2 medium-sized parathas instead of 6 larger ones.

Cheese Parathas


Makes 2 medium parathas

Ingredients:
  • 1/4 cup whole wheat flour
  • 1/8 cup all-purpose flour
  • 1/8 teaspoon of salt
  • 3/4 teaspoon oil
  • approximately 3 tablespoons lukewarm water
  • 2 tablespoons green onion, minced
  • 1 heaping tablespoon sour cream
  • 1 tablespoon chopped cheese curds
  • salt
  • pinch of granulated garlic
Directions:
  1. Sift together the salt, whole wheat flour and all-purpose flour in a bowl.
  2. Add the oil and mix briefly to moisten the flour, then pour in the water.
  3. Stir the mixture together with a fork until it forms a ball, then turn it out onto a floured surface and knead until it is smooth.
  4. Let rest for 10 minutes.
  5. In a small bowl, mix together the minced green onion, cheese curds, sour cream salt and granulated garlic until well combined.
  6. Divide the dough into two pieces and roll them out into a circle about 1/4 inch thick. Place half the filling in the center of the dough and then bring all the edges together and pinch them closed so that you have a ball of dough encasing the filling. Repeat with the second piece of dough and let them rest for 2 to 3 minutes.
  7. Carefully roll out the stuffed ball of dough to a circle about 4 inches in diameter - the first few times you do this, the filling may squeeze out a few holes. Don't worry too much about this, it will gtet better with practice.
  8. Lightly oil a griddle or a large skillet - I use my cast iron skillet or griddle and raise the heat to high. Place the rounds of bread on the hot griddle and cook until the edges begin to brown slightly, then flip them over. If the rounds puff up a bit as you're cooking, that is a very good thing.
  9. After about 3 minutes, flip them over again to check the color, they should be speckled golden brown. Cook for another 2 to 3 minutes and then place them on a plate lined with paper towel to absorb any excess oil if needed.
  10. Serve hot.

Tuesday, November 22, 2011

Carrot Cake Cupcakes

Cupcakes.

Cake. Mmmm, cake. This reminds me of my kids' all-time favorite blog post not written by their mother (they are a loyal couple of kids, I give them that):  The God of Cake. You should read it if you haven't already. The kids love it when I read it aloud, complete with funny voices and the occasional sound effect.

But anyway, back to cupcakes:


Sometimes I just get a hankering for some cake or a cupcake, but I never actually need an entire cake or 3 dozen cupcakes. Yesterday it was carrot cake that I wanted badly, but I couldn't justify baking an entire carrot cake  or 3 dozen cupcakes the day before I head out of town for Thanksgiving, so I did my best to cut my usual recipe way down. I ended up with 8 tasty little cupcake morsels, which is a good number for the 3 of us to demolish in 24 hours without feeling gluttonous.


Carrot Cake Cupcakes


Makes 8 cupcakes

Ingredients:
  • 1/2 cup all-purpose flour
  • 1/2 cup turbinado sugar (Sugar in the Raw)
  • 3/4 cup carrots, shredded 
  • heaping 1/4 teaspoon baking powder
  • heaping 1/4 teaspoon baking soda
  • 1/2 teaspoon cinnamon
  • 1/4 cup oil
  • 1 egg
  • 1/4 cup sour cream
  • 1/2 teaspoon vanilla extract
  • 1/4 cup chopped pecans
For the frosting:
  • 2 tablespoons butter, softened at room temperature
  • 2 tablespoons cream cheese softened at room temperature
  • approximately 1 cup confectioner's sugar
  • 1/2 teaspoon vanilla extract

Directions:
  1. Preheat the oven to 350 F and prepare a 8 wells of a muffin tin with cooking spray or paper liners. I used silicone cupcake baking cups sprayed with a bit of cooking spray.
  2. Sift together the flour, sugar, baking soda, baking powder and cinnamon into a large bowl.
  3. In another bowl mix together the egg, oil and sour cream until smooth, then add the vanilla extract.
  4. Add the egg mixture to the dry ingredients and mix well. Then add the grated carrot and combine.
  5. Fold in the chopped pecans and fill the muffin cups about 3/4 of the way with the muffin mixture.
  6. Bake for 20 - 25 minutes or until a tester comes out clean.
  7. Place the pan on a cookie rack to cool and then frost with cream cheese frosting when totally cool.
  8. Make the frosting by beating together the softened cream cheese and butter with a hand mixer on medium-high speed until everything is mixed together and smooth. Add the vanilla and mix well. Slowly add the confectioner's sugar a bit at a time as the mixer is running. Stop occasionally to scrape down the bowl. Mix until smooth and use immediately.


Notes:

Monday, November 21, 2011

Potatoes Romanoff

Potatoes are a common comfort-food theme for a lot of people, and make an appearance as a side dish on a lot of dinner tables:. They can be roasted, fried, mashed, boiled, and of course, baked, and they can be as humble as oven-roasted potatoes or as elegant as Potatoes Dauphinoise.

Another fancy-sounding potato side dish is my version of Potatoes Romanoff, also a quick and easy way to use up leftover baked potatoes. I almost never have leftover baked potatoes, but it is criminally easy to bake a russet and then chill it, so I don't let the lack of an extra baked potato hanging around in my fridge stop me from making this dish. Since my kids are not potato fans, I did have to scale this recipe back a bit, but it's just as easy to make this for one person as it is for 8 or 16.

Potatoes Romanoff 


Serves 4 as a reasonable side dish, or 2 generously and 1 gluttonously


Ingredients:
  • 1 large russet potato (about 11 oz.)
  • 1/4 cup shallots, minced
  • 3/4 cup extra-sharp cheddar cheese, grated (about 3 oz., moderately packed down)
  • 1/4 teaspoon dried dill
  • 1/4 teaspoon granulated garlic
  • 1 teaspoon sea salt 
  • pinch of cracked black pepper
  • 3/4 cup sour cream
  • grated cheddar
  • chopped scallions
Directions:
  1. Preheat oven to 450 F. Scrub your russet potato and pierce with a knife or fork in several spots. Wrap it in foil and set it right on the racks and bake for about an hour. Take out, unwrap and let come to room temperature and then chill in the fridge for a few hours.
  2. Preheat oven to 350 F and grease a small casserole dish or 2 small gratin dishes.
  3. Take the chilled baked potato and grate it, skin and all, with a box grater. 
  4. In a large bowl, mix together the shallots, grated potato, salt, pepper and dill, taste to adjust seasoning.
  5. Fold in the sour cream and 3/4 cup of grated cheddar and combine well.
  6. Pour the mixture into the casserole dish or gratin dishes and top with more grated cheddar and bake for 30 minutes or until the top is golden brown.
  7. Sprinkle with chopped scallions and serve.

Notes:
  • This doubles, triples and quadruples easily if you need to serve more people.

Sunday, November 20, 2011

Huffington Post Kitchen Daily

How have I not seen this page before?

Huffington Post Kitchen Daily appears to be their revamped food section, and I approve. I've only begun to dive into it, but this section on dealing with the avalanche of Thanksgiving leftovers looks terrific. It would be even better if the links to their recipes worked. Hrmm. :/

I am salivating over the image of the Sweet Potato and Caramelized Onion Shells, but alas, no recipe to be found. Let's hope that they work out the html kinks before Black Friday. All of those manic shoppers are going to need sustenance.

Friday, November 18, 2011

Loaded Baked Potato Soup

What is is about potatoes that make them so satisfying as comfort food? It's got to be the dense starchiness. It gives a sense of solid fullness, and it also turns from bland starchiness to sweet on your tongue as you eat it. Add salt to that, as many of use do with potatoes, and you get that double-whammy of sweet and salty.

Baked potatoes in particular serve as a vehicle for other lovely flavors and textures, especially creamy. The smoothness of the the fat in butter and cheese is really one of the more simple and sublime parts of enjoying foods, and the main reason I could never sustain veganism. Cheese, sour cream, butter on a baked potato - hardly makes your waistline happy, but it certainly results in happy tummy syndrome.

So, what could be more satisfying than a loaded baked potato? Making it into a soup.

This is a great recipe to deal with leftover baked potatoes - as if there could even be such a thing - or you could do what I did and bake a potato for the express purpose of making this soup. You'll thank me.


Loaded Baked Potato Soup


Ingredients:

  • 1 russet potato
  • ¾ cup leeks
  • 2 tablespoons butter
  • 1 tablespoon flour
  • ½ teaspoon salt 
  • pinch of pepper
  • ¼ teaspoon granulated garlic or garlic powder
  • ½ teaspoon dill
  • 2 cups milk
  • ½ cup shredded cheddar cheese
  • crumbled bacon
  • shredded cheddar
  • sour cream
Directions:
  1. Bake a russet potato for an hour at 400 F. Take out and let cool. Then scrape out the potato and mash up with a fork. You'll have about 1 cup. You can used a leftover baked potato if you have one lingering in your fridge.
  2. Meanwhile, saute ¾  cup leeks over olive oil or some sort of fat (I used a smidge of butter) until soft. Then add 1 heaping tablespoon of flour and stir until it's all mixed in, about 2 minutes.
  3. Add ½ t salt, a pinch of pepper, ¼ t granulated garlic or garlic powder and ½ t dill.
  4. Pour in 2 cups of milk and heat over low heat, stirring constantly, until mixture has thickened (about 10 minutes). 
  5. Puree it with a stick blender or in small batches in a regular blender if you want a uniformly smooth texture, otherwise, enjoy the rustic texture.
  6. Add ½ cup shredded cheese (I used an extra-sharp white cheddar) and stir until the cheese melts. Taste to adjust seasoning - this soup can really take a lot of salt before it's noticeable.
  7. Serve in a bowl garnished with your favorite baked potato toppings. I had shredded cheddar, crumbled bacon and sour cream.

Thursday, November 17, 2011

French Onion Soup

The main reason I made that beef stock the other day was so that I could make French Onion soup. Last year, when I made beef stock for the first time, I had been inspired by Thomas Keller's French Onion soup recipe, but life events conspired in such a way that I never did get to make the soup, and I ended up freezing the stock for use in other recipes during the year, like my (inauthentic but still delicious) spaghetti bolognese, mushroom wine sauce, pot roast, crockpot chili and beef stew.

Well, the vision of that French Onion soup never left me, and I knew that I was going to make it with the freshest batch of beef stock I could, and let me just start by saying, I felt that it was totally worth the 14 hours it took me on Monday to make the stock, plus the 5-hour caramelization time for the onions yesterday.

I think that time is of equal importance in developing the flavor. I read that "the difference between a home cook and a professional chef is that the latter has the guts to keep the dish on the fire longer to get that extra flavor." - from Chowhound

This recipe fulfills that requirement. I started prepping at 8:30 am and ate my first bowl of this soup at 4:15 pm. Well worth the wait.


I did not keep faithfully to Keller's recipe, mostly by accident (I totally forgot to add the flour), and I halved it since I would be the only one eating it and my freezer is jam-packed with various stocks and containers of other soups, but it was still far and away the best French Onion soup I've ever had.

I started with 4 lb. of sweet onions, Maya Sweets from Peru, though I'd have used vidalias if they'd been in stock. Peel the onions, cut them in half through the root and then slice thinly widthwise. Toss them into your largest dutch oven (I used my 7-quart pot) along with 1 tablespoon of olive oil and 4 tablespoons of salted butter and cook over very low heat, stirring to incorporate the melted butter and olive oil evenly. Stir occasionally, every 15 minutes or so.


As you can see, at the 1-hour mark, the volume of the onions has reduced significantly:


Still at the 1-hour mark, the onions will have released a great deal of moisture.  Keep stirring every 15 minutes or so and keep the heat low so that it does not simply brown without caramelizing or, worse yet, burn. It will seem very slow going. That's what we want.


After 2 hours, the onions have really reduced to just a fraction of what they had been and most of that moisture has evaporated and you might noticed a slight bit of coloration.


Also, after 2 hours, the onions start to get creamy.

Keep stirring every 15 minutes.


At 3 hours, oddly enough, the onions looked a lot like they did at the 2-hour mark, but the kitchen smelled much more strongly of that sweet smell of onions slow cooking. At this point, I started to check the onions more frequently, every 10 minutes, and stirring when needed.

When you stir, you'll notice a buildup of the sugary juices from the onions on the bottom of the pot. Watch that carefully, because that is where any browning and burning will begin. In my experience, that gets to be like a chain reaction, once it starts to burn, it moves VERY QUICKLY, and there is no recovering from scorched foods.


At the 3 ½ hour mark, a real change in color. There may be a few spots which are a little bit darker, which is ok, as long as you keep a watchful eye and be diligent about stirring every 10 minutes. I scraped up the film on the bottom to incorporate it back into the onions and keep it from burning. It seemed to work.


4 hours in, the onions are a deeper brown color and quite sticky and sweet. I tasted some. Even after 4 hours of cooking, they still had some bite to them, so another hour to soften is a good thing.


4 ½ hours in, a bit darker, and much stickier. At this point, for the last hour or so, I am in the kitchen prepping everything else and stirring pretty frequently and checking that it does not burn.


5 hours later... a mess of sticky, sweet, caramelized onions lounging on the bottom of the pot. Only 5 hours earlier, the onions had filled this pot to nearly the top.  How magically simple, just applying low heat and time.


For the soup, reserve ¾ cup of the caramelized onions - store the remainder in the fridge or freezer for future use.


Make the croutons: preheat the oven to 450° F. Slice up a baguette into ½ inch rounds, pour some olive oil into a bowl and add 1 teaspoon of granulated garlic and brush both sides of the bread with the garlicky oil. Place the rounds on a baking sheet lined with aluminum foil, parchment paper or a baking mat and toast for 10 minutes, then take out, flip over and bake another 5 minutes or so or until golden brown.


See? Lovely garlicky croutons.


Prepare your herb sachet by placing 2 bay leaves, 4 or 5 sprigs of fresh thyme and 8 black peppercorns into a cheesecloth bag.


Place the ¾ cup of caramelized onions in a 3-quart soup pot,* (See Notes) add 1½ quarts of beef stock, 2 teaspoons of sea salt and the herb sachet. Bring to a boil and let simmer uncovered for an hour and a half or until reduced to about 3 cups.

Season with ¼ teaspoon of sherry vinegar, though I'm betting balsamic or champagne vinegar would be nice too. Ladle into oven-proof soup bowls, top with the croutons and shredded cheese: Emmenthaler, Comte or even Gruyuere. Ideally, you'd pop this under the broiler until the cheese melts and browns, but I don't really have a broiler (long story there), so I stuck it in a 400° F oven for 10 minutes.


French Onion Soup


Ingredients:

  • 4 lb. sweet onions, sliced thinly
  • 4 tablespoons salted butter
  • 1 tablespoon olive oil
  • 1½ quarts of beef stock
  • 2 bay leaves
  • 3 - 4 sprigs fresh thyme
  • 8 black peppercorns
  • cheesecloth
  • 1 tablespoon flour * See Notes
  • 1 tablespoon sea salt
  • ¼ teaspoon of sherry vinegar
  • French baguette, sliced into ½ inch rounds
  • olive oil
  • granulated garlic
  • shredded Emmenthaler cheese


Directions:

  1. In your largest dutch oven or a large stock pot, melt the butter and olive oil and add the onions. Lower the heat to the lowest setting and stir the onions every 15 minutes.
  2. After the 1-hour mark, the onions will have reduced in volume and released a lot of moisture. Keep stirring every 15 minutes and let the onions slow-caramelize for another 4 hours, stirring every 15 minutes until they really start to change in color, then stir every 10 minutes to be sure that they don't burn.
  3. Once the onions have cooked down and caramelized, make the croutons: Preheat oven to 450° F. Pour some olive oil into a bowl and add 1 teaspoon of granulated garlic and brush both sides of the bread with the garlicky oil. Place the rounds on a baking sheet lined with aluminum foil, parchment paper or a baking mat and toast for 10 minutes, then take out, flip over and bake another 5 minutes or so or until golden brown.
  4. Place the bay leaves, thyme and peppercorns into your cheesecloth bag.
  5. Reserve ¾ cup of the caramelized onions for the soup. Keep the remainder in the fridge or freezer for other recipes or a second batch of this soup. Place the onions in a 3-quart soup pot over medium heat, add the flour and and stir until incorporated. Add the beef stock, salt and sachet, bring to a  boil and then reduce heat to low and let simmer uncovered for an hour and a half or until reduced to about 3 cups.
  6. Season to taste with more salt and pepper and add  ¼ teaspoon of sherry vinegar, and ladle into oven-proof bowls. Top with croutons and shredded cheese and stick under the broiler until browned and bubbly.


Notes:

  • Keller's recipe calls for a bit of flour stirred in with the caramelized onions before the addition of the stock but I just completely forgot about it. I was still pleased with the end result and I am not usually a huge fan of flour-thickened soups anyway.

Wednesday, November 16, 2011

Beef Stock

Here is the end result of the other day's 14-hour beef stock process.


All told, I got just over 1 gallon of stock: 9 ½ quarts of deep, rich brown beef stock.

I froze 2 quarts of stock in ice cube trays and put the cubes into labeled freezer bags so they'd be ready to go, and yesterday I reduced 1 quart of stock to about 1 ½ cups of a concentrated stock and froze those in ice cube trays as well.

I still have 6 ½ quarts in the fridge ready to be used, and I plan on putting at least 1 ¾ quarts of it to use today as I attempt Thomas Keller's French Onion soup.  His book, Bouchon, is on my Christmas wish list, and just might be the gift I gift myself this year. :)

Tuesday, November 15, 2011

Peanut Butter and Chocolate Blondies

Brownies may be my favorite sort of cookie, but sometimes I have a hankering for the non-chocolate, blondie version. They are great with butterscotch chips, but they are phenomenal with peanut butter and chocolate, a time-honored flavor combination that never lets me down.

These come together really quickly and I hardly ever wait for them to cool before I dive into the pan.


Peanut Butter and Chocolate Blondies


Ingredients:

  • 1¼ cups all-purpose flour
  • ½ teaspoon baking soda
  • ½ teaspoon salt
  • ½cup butter, softened
  • ½ cup granulated sugar
  • ½ cup firmly packed brown sugar
  • 1 large egg
  • ½ teaspoon vanilla extract
  • 1 cup peanut butter chips
  • ½ cup chocolate chips (I used dark chocolate)

Directions:

  1. Preheat oven to 350°F (175°C). Grease a 9-inch square baking pan.
  2. Sift together flour, baking soda and salt, whisking well to break up any clumps and set aside.
  3. In a large bowl, with an electric mixer at medium speed, cream together the butter with sugar and brown sugar until fluffy.
  4. Add the egg and vanilla and beat well. Gradually add dry ingredients, beating on low speed until thoroughly combined.
  5. Fold in the chips and make sure they're all well incorporated into the dough.
  6. Spread the dough in prepared baking pan and bake for 15 to 20 minutes, or until set. 
  7. Cool on wire rack and then cut into bars.

Monday, November 14, 2011

Making Beef Stock

I first made beef stock last winter and was amazed by the difference between homemade stock and stock from a cube or a granule. There is no doubt that this is a time-intensive endeavor requiring maintenance as you skim the impurities from the surface of the stock, but I think that it is worth the time and effort.

I was inspired by this video and make stock basically the same way, with a few of my own changes.


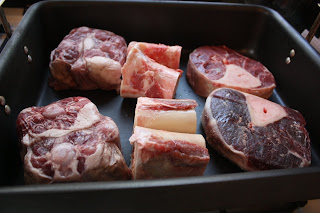
I started with 8 lb. of bones and meat: 4 lb. of oxtails on the left, 2 lb. of beef marrow bones in the middle, and 2 lb. of beef shanks on the right.

Preheat in the oven to 450 F.


Cover the bones with 12 oz. of tomato paste.


Add 2 large carrots on top of the beef and then roast for an hour.


Meanwhile, grab your largest stock pot. I use my monster 20-quart pot for beef stock.


Heat some olive oil and sweat down onions, leeks, carrots and celery. I used 2 large onion, chopped roughly, about 2 cups of leeks, both the white and the green parts, 2 more large carrots, roughly chopped, and a large bunch of celery, chopped.

Cook until it starts to soften.


Then add 2 bay leaves, a large amount of parsley, fresh thyme and 2 large roma tomatoes, quartered.


See the lovely roasted bones?


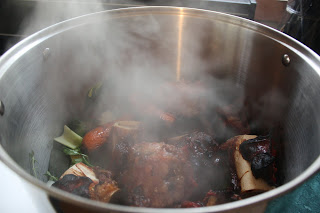
Take the roasted bones, carrots and tomato paste and add it all to the stock pot.


Deglaze the roasting pan with some white wine and a bit of water and and scrape up all of the lovely fond at the bottom and then add it to the stock pot as well.


Add enough cold water to cover the everything in the pot and bring up to between 180 and 200 F, and let simmer uncovered for 8 - 12 hours.


As the stock simmers, skim off any fat, scum and impurities.


In about 10 hours, the stock will be finished, at which point I'll strain it and cool it in an ice bath and then freeze in ice cube trays. Stay tuned...

Sunday, November 6, 2011

Crab Tartlets

We love finger foods here. I am always on the hunt for new appetizers to serve at the various family functions. Puff pastry is always a good place to start. You can create strudels out of it, layer it with ingredients and fold it over, cut it into rounds and place them in muffin tins, it provides a near infinite variety of snacks and dishes.

The family also goes nutso over seafood, particularly crab, so any opportunity to fold together something crabby with something creamy is always welcome in this house.


Crab Tartlets


Makes 12 tartlets


Ingredients:
  • 1 sheet puff pastry, thawed and cut into rounds with a 3 inch biscuit cutter
  • ½ cup lump crab meat, roughly chopped
  • 2 tablespoons of mayo
  • 2 tablespoons garlic and herb Boursin cheese
  • ½ teaspoon sriracha more or less to taste 
  • 1 teaspoon whole grain mustard
  • 1½ teaspoons minced shallot
  • 1½ teaspoons minced celery
  • ¼ cup shredded cheese - I used a mixture of extra-sharp cheddar, parm and romano
  • Old Bay to taste
  • ¼ cup soft, unseasoned bread crumbs

Directions:
  1. Preheat the oven to 375° F.
  2. Place the rounds of puff pastry into the bottom of a 12-well muffin pan.*
  3. Mix together the crab, mayo, sriracha, mustard and Boursin in a bowl, then add the minced shallot and celery and the shredded cheese. Stir well to combine.
  4. Taste and then season with salt, pepper and Old Bay to suit your taste.
  5. Add the bread crumbs and toss to combine well.
  6. Put a heaping teaspoon on top of each pastry round in the muffin pans and then bake for 15 - 20 minutes or until the pastry starts to get golden brown. 
  7. Carefully pry the tartlets from the muffin pan and let cool on a wire rack and then serve.
Notes:
  • I put the pastry rounds into an ungreased muffin pan and then stuck like hell, but for some reason, with this particular muffin pan, that is always the case. Next time I might try greasing it liberally with Crisco or even resorting to muffin liner papers or using my new silicone muffin cups.
  • Any leftover crab mixture makes a wonderful crab cake mixture with the addition of a bit more soft bread crumbs. The resulting texture is soft and somewhat bready, like what you get with baked stuffed clams. It was an unexpected delight.


Saturday, November 5, 2011

Butternut Squash Risotto with Caramelized Onions and Crispy Sage Leaves

Risotto is one of my little indulgences. The kids have only recently decided that they like rice, and they are still very particular about which rice dishes they find acceptable. My quinoa and rice pilaf is at the very top of their list, but risotto is my favorite.

Risotto is more of a technique than a dish, and it is open to an almost infinite variety of combinations. The first risotto I ever had was a spinach risotto with toasted pine nuts, and my standard is a wild mushroom risotto with pancetta and thyme.

I came across this recipe from Williams Sonoma and knew that had to make a variation of it. I love the combination of butternut squash and sage, and I thought that the addition of the sweet, sticky caramelized onions would be a lovely addition to the creaminess of the risotto.

It was.


Butternut Squash Risotto with Caramelized Onions and Crispy Sage Leaves


Makes 1 serving


Ingredients:
  • 1 medium onion, sliced thinly
  •  4 tablespoons of butter
  • olive oil
  • 3 tablespoons minced shallot
  • ¼ cup Carnarole rice or another suitable risotto rice like Arborio or Vialone Nano
  • ¼ cup sherry or white wine
  • 1 quart warm stock
  • ¼ cup roasted butternut squash, cubed
  • ¼ cup roasted butternut squash, pureed
  • salt
  • pepper
  • ½ cup freshly grated parmesan
  • whole fresh sage leaves

Directions:

  1.  Make the caramelized onions by cooking down the thinly sliced onion in 2 tablespoons of butter over low heat for an hour or until the are richly browned and sticky. Stir frequently to be sure that they don't stick and burn. Set aside.
  2. Make the crispy sage leaves by melting 1 tablespoon of butter and sauteing the leaves until crispy. Set aside.
  3. Melt 1 tablespoon of olive oil and 1 tablespoon of butter in a large skillet and saute the shallot until soft, then add the rice, stirring until everything is nicely coated. Cook for 2 minutes.
  4. Pour in the sherry or wine and cook, stirring frequently, until all of the liquid has been absorbed.
  5. Start adding the warm stock 1 ladleful at a time, stirring frequently, and continue to cook until the rice is done al dente - it will still have some bite to it, but not be chalky or crunchy. The grains of rice should have lost the white opaque center. This could take 10 minutes or up to 20 minutes depending on hte type of rice. Taste as you go.
  6. Add your salt and pepper and stir in the caramelized onions and grated parm. Stir well.
  7. Serve topped with crispy sage leaves.

Notes:

  • I made a few changes from the original recipe because I wanted both pureed squash and cubes of squash for a little textural contrast, and I used sherry instead of white wine because that's what I had on hand.

Friday, November 4, 2011

Pumpkin Bread

Look! More pumpkin!

Yes, we've been hot-and-heavy with the winter squashes lately, but that's ok, because they are equally delicious in sweet and savory dishes alike. Some people think that pumpkin's only reason for existence is to be carved into some gruesome jack o'lantern for Hallowe'en or magically whipped up into a pie for Thanksgiving, but it is so much more versatile than that.

Truth be told, pumpkin pie isn't even my favorite pumpkin dessert. No, that would be spiced pumpkin cheesecake. Coming in after that, and still before the pie, are pumpkin gingerbread and pumpkin bread, and those are still in the realm of desserts. Dishes such as pumpkin lasagna, pumpkin ravioli in sage brown butter and curried pumpkin soup do a fantastic job of showcasing pumpkin's savory side.

If you want something pumpkiny and immediate, a quick bread like this one really delivers. It took me longer to assemble my ingredients than it did to get the batter in the oven, and the scent that filled the house while it was baking was just indescribably wonderful. Those fall baking smells are one of the reasons I look forward to fall so intensely.

This loaf is richly scented and moist, with the bits of pecan studded here and there providing nice texture.

Pumpkin Bread


Ingredients:
  • 1 cup fresh pumpkin puree, or about ½ of a 15 oz. can
  • 2 eggs
  • ½ cup pumpkin-apple butter*
  • 1/3 cup water
  • 1 cup brown sugar
  • 1¾ cup all-purpose flour
  • 1 teaspoon baking soda
  • ¾ teaspoon salt
  • 1 teaspoon cinnamon** 
  • ½ teaspoon nutmeg
  • ¼ teaspoon cloves
  • ¼ teaspoon ground ginger
  • ½ cup chopped pecans
Directions:
  1. Preheat the oven to 350° F
  2. Grease and flour a large loaf pan.
  3. Ina  large bowl, mix together the pumpkin puree, eggs, pumpkin-apple butter and water until thoroughly combined. I did this in the food processor when I realized that the pumpkin puree I had processed the other day still had some chunks of pumpkin in it.
  4. In another bowl, mix together the flour, baking soda, salt and spices.
  5. Add the dry ingredients to the wet, and mix well.
  6. Stir in the pecans.
  7. Scrape the batter into the prepared loaf pan and bake for 50 - 60 minutes or until a toothpick or cake tester comes out clean.
  8. Cool in the pan for 5 minutes and then turn out onto a wire rack and let cool.

Notes:
  • I replaced the oil that is usually found in these recipes with pumpkin-apple butter, but if you don't have any, you can substitute with the same amount of applesauce or a mild oil, like canola.

    If you do use the same pumpkin-apple butter, you can cut down on the spices provided in the recipe, because the pumpkin-apple butter is very generously spiced already. In fact, I added no extra spices at all. If you decide to use oil or applesauce, however, you will need to add the spices listed in the recipe.

Thursday, November 3, 2011

Butternut Squash and Crab Bisque

I had this recipe in mind when I first got my hands on a butternut squash at the farmers' market back in September. I went so far as to make my own shellfish stock by simmering crab shells and leftover shrimp tails with white wine, onions, celery and carrots and a hit of tomato paste. The house smelled like a crab house down by a Maryland pier, and the cat was going out of his mind, taunted by the smells of seafood.

As it turned out, by the time the stock had finished simmering and I had cleared out the detritus of stock-making, I lost my will to live and felt no urgency to clean, roast and then puree the squash, so I ended up freezing the stock for "some other time."

Well, that time came, and was it ever worth it!


Butternut Squash and Crab Bisque


Ingredients:
  • olive oil
  • 1 medium onion and 1 small shallot, chopped - about 1 cup, total
  • 1/2 cup chopped carrot - I also tossed in some leftover parsnip
  • 1/2 cup chopped celery
  • 2 cups butternut squash - I used already roasted cubes and puree
  • 2 - 3 quarts of stock, simmering - I used homemade shellfish stock, but chicken or vegetable  will work nicely too*
  • Old Bay
  • salt
  • pepper
  • crab meat
  • cracker crumbs (optional)
  • heavy cream (optional)
  • sherry (optional)

Directions:
  1. Saute the chopped onion and shallot in olive oil over medium heat until softened, then add the carrots, parsnip (if using) and celery and cook until the vegetables are soft.
  2. Add the butternut squash and 2 cups of the warmed stock and bring to a boil, then add another 2 cups of stock and simmer, covered until the squash is fully cooked, adding more stock as needed.
  3. Puree the soup with a stick blender or in batches in a blender, adding more warm stock as needed to reach the consistency you like.
  4. Season with salt, pepper and Old Bay. You can be generous with the Old Bay. This soup can accept a lot of seasoning. 
  5. Ladle into bowls, hit with a shot of cream and/or sherry and top with lump crab meat and cracker crumbs and another dusting of Old Bay.

Notes:

  • When I make pureed soups like these, I generally keep a large pot of stock simmering on the back burner. I can never say with certainty how much stock goes into these soups, but I'd rather err on the side of having too much stock at hand than not enough. Any remaining stock gets refrigerated or frozen in ice trays for other uses, so stock never has to go down the drain.


Wednesday, November 2, 2011

Chicken Fricassee

Chicken fricassee is, as you might guess, a French dish. I've heard it described as French comfort food, and why not? Basically you take some chicken and simmer it to wonderful succulence in a thickened sauce with aromatic vegetables and then, the pièce de résistance, go that extra mile and cook down that sauce to a rich, cream-bolstered gravy. How can anyone go wrong with that?

Here in central NY, I've heard this dish called, fondly, "Chick Frick," or even "Frickin Chicken," and everyone seems to have pretty strong opinions of what is or is not Chick Frick. Kopp's Canteen in Chittenango was known for its chicken fricassee and had a loyal following who were pretty bummed when the restaurant closed a few years ago. Not too long ago, there was even a piece in the local paper announcing that another restaurant had the original Kopp's Canteen recipe for chicken fricassee. Big news. Seriously.

The thing is, this is not a difficult dish. I was fortunate enough to have the Chick Frick at Kopp's before they closed, and the fans are right - it was really good. I don't claim to have Kopp's original recipe, but I will say that this one I make is pretty damned tasty. It is tasty enough to get my kids to devour 2 full servings of it, and let me tell you, that's pretty good.

Aside from how delicious and satisfying this meal is, one of the things I like the most about this dish is how it fills the house with a wonderfully inviting smell that lingers... in a good way. Now, I love fish, and it smells divine while it's cooking, but that smell is not one that improves with time. Hours after a seafood meal, the kitchen does not smell especially inviting, and I'm usually rubbing everything down with lemon juice and spritzing the joint with Lysol to fight back the odor of once-cooked fish. Hours after a chicken dinner has been cooked and devoured, the kitchen still has that cozy comfort-food scent to it.

Feed the body with nourishing food, feed the soul with coziness. It works for me.


Chicken Fricassee


Serves 2 hungry kids 

Ingredients:
  • 4 chicken drumsticks, rinsed and patted dry
  • ½ cup flour
  • 1 teaspoon sweet Hungarian paprika
  • ¼ teaspoon black pepper
  • ½ teaspoon granulated garlic or garlic powder
  • butter
  • ½ cup chopped onion
  • ¼ cup diced parsnip
  • ½ cup chopped mushrooms - I used royal trumpet mushrooms, but any of your favorite mushrooms would be nice
  • a good glug of sherry, 1 - 2 tablespoons
  • 1½ - 2 cups warmed chicken broth
  • sprigs of fresh thyme 
  • 2 small bay leaves or 1 large bay leaf
  • salt
  • pepper
  • heavy cream
Directions:
  1. Place the flour, paprika, black pepper and granulated garlic (or garlic powder) in a large ziplock bag and shake gently to mix. Add the drumsticks to the bag, seal and shake to coat the chicken with the flour mixture thoroughly. Remove the flour-coated chicken to a plate to rest and reserve the flour and spice mixture in a bowl and set aside.
  2. In a dutch oven or a large, deep skillet, melt 1 tablespoon of butter over medium-high heat and brown the chicken until all sides are nicely golden. Remove the chicken to a plate and let rest.
  3. If the chicken released a lot of fat, you might want to drain off some of that grease, otherwise leave it there and add to the sizzling fat + butter combination, adding more butter if needed, your chopped onions and let cook until softened. Then add the parsnips and cook for 2 minutes before adding the chopped mushroom. 
  4. Cook for another 2 - 3 minutes or until the veggies are soft, then add 1 cup of your warmed chicken broth and a few glugs of sherry.
  5.  Stir in the reserved flour and spice mixture that you used to coat the chicken, stirring well to make sure that the flour is incorporated and the sauce is not lumpy.
  6. Add the sprigs of fresh thyme and bay leaves and bring to a boil. Place the chicken back into the pot and pour in the remaining ½ - 1 cup of broth, cover and reduce the heat to low and let simmer until the chicken is thoroughly cooked, with an internal temperature of 165° F, about 45 minutes to an hour.
  7. Once the chicken has cooked through, remove it to a plate and cover loosely with foil to keep warm, and work on the sauce. Skim off any pools of grease floating on the top. Fish out and discard the bay leaves and thyme sprigs, raise the heat to medium-high and let the sauce cook down, stirring frequently to make certain that it does not scorch. 
  8. Once it has thickened to your liking, maybe after 10 minutes, maybe after 20, it's up to you, add a shot of heavy cream and stir. I start with about 1 tablespoon and go from there. If you like, you can finish the sauce with a squeeze of lemon juice or a tiny splash of sherry vinegar to add a little acidic bite, but my kids prefer it without.
  9. Taste to check for seasoning and add salt or pepper as you feel necessary and serve with your chicken over biscuits, noodles or rice.
Notes:
  • These 4 drumsticks were enough to feed my 2 kids. Obviously, if you are cooking for a crowd, you'll want to make way more. 
  • Instead of parsnips, you could use some carrot. I have grown fond of onion-parsnip-mushroom combination, but do what works for you.

Tuesday, November 1, 2011

Maple-Walnut Butter Tart

I am a huge fan of maple, particularly with walnut. Maple-walnut ice cream is one of my all-time favorites, and a few years ago, I made mini maple-walnut apple crisps, which my kids devoured pretty quickly. Even though I live in a maple-producing state, and real, good-quality maple syrup is abundant and relatively easy to find in any grocery store, you'd be surprised find that, short of visiting a maple sugar house, it is very difficult to find granulated maple sugar or maple butter.

This summer at the downtown farmer's market, I found a vendor there one day with locally produced granulated maple sugar and maple butter, and I quickly snagged the largest jar of the sugar that they had, knowing that I could find at least 101 uses for it.

This is my maple-walnutty version of the classic Canadian sweet, the butter tart. It's similar to English treacle tarts, or Southern pecan pie, and not dissimilar to the molasses-based  Shoofly pie of the Amish - it basically seems to be a buttery crust filled with a sugar-intense, gooey filling. Everything else is optional, except for the sighs of delight, and maybe the wish for a vial of insulin.


Maple-Walnut Butter Tart


Ingredients:

For the press-in butter crust
  • 1 cup all purpose flour
  • 2 tablespoons sugar
  • 6 tablespoons butter
  • 1 egg yolk
For the filling:
  • 1/4 cup maple syrup
  • 2 tablespoons packed granulated maple sugar
  • 2 tablespoons packed dark brown sugar
  • 2 tablespoons butter, melted and then cooled
  • 1 egg
  • pinch of salt
  • 1/4 teaspoon vanilla
  • golden raisins
  • chopped walnuts, almost to the point of being pulverized
  • granulated maple sugar
Directions:
  1. Make the crust by mixing together the flour and sugar and rub in the butter until the mixture resembles coarse crumbs. 
  2. Add the egg yolk and mix well, pressing it into a ball. 
  3. Rip off a portion of the dough and press it into your tart pan. Repeat with more dough - you will likely have some of this dough left over. Wrap it in plastic wrap and keep it for another use. 
  4. Lay down a small piece of parchment in the tart shells and add some baking weights or dried beans and and blind bake them at 300 degrees Fahrenheit for 12 minutes. 
  5. Remove and let cool.
  6. Raise the oven temp  to 400 degrees F. 
  7. Mix together the maple syrup, 2 T of brown sugar and 2 T of maple sugar. 
  8. Add the melted butter and stir to combine well. 
  9. Add the egg, stir. Add the salt and vanilla and mix until it is nicely smooth.
  10. Place a few golden raisins and some of the chopped walnut in the bottom of the tart shells. 
  11. Sprinkle some granulated maple sugar over it and pour in the sugar mixture. 
  12. Top with a bit more of the chopped walnut and sprinkle some granulated maple sugar on top and bake for 15 - 20 minutes or until just set.


Related Posts with Thumbnails