Friday, December 16, 2011

Vanilla Cupcakes

I've been busy lately preparing for Christmas and a birthday. We made a gingerbread house (pictures to come), I've been knitting scarves as gifts, and I've been planning Cookie-Palooza. Also, my younger daughter's birthday was yesterday, so I made a batch of vanilla cupcakes to bring into her class AND a whipped up a batch of chocolate cupcakes for home. Next up for today, make the ice cream cake for her party this weekend.

 I'll be back with more food soon, but until then, a teaser: Best-Ever Vanilla-Bean Birthday Cupcakes.


Be back soon!

Saturday, December 10, 2011

'Tis the Season

...and today we're going to be making a gingerbread house!

I have turned to King Arthur Flour for ideas, and wouldn't you know it, they have a pdf document on Building a Gingerbread House.

A friend of mine also turned me onto this site where they demonstrated making a gingerbread castle, and I spent some time on Google looking for images for inspiration and found Gingerbread House Heaven, so we should be well-prepared in the inspiration department. Yesterday I bought a variety of candies for decorating this house - Twizzlers, Andes mints, gum drops, candy canes and many more, so we'll see what genius my kids can come up with.

Friday, December 9, 2011

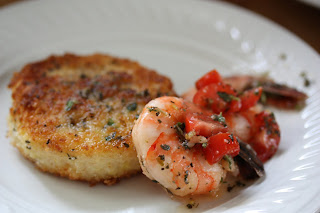
Pan-Fried Cheese Grits Cakes with Lemon and Olive Oil Marinated Shrimp

I have been having fun pan-frying lately what with the Schnitzel, goat cheese rounds and catfish. With the right sized item, it really is a pretty quick and easy method of cooking. Plus, there is a real satisfying crunch and texture to something that has been breaded with Panko crumbs and then fried in really hot oil.

The catfish strips from the other day inspired me to make another southern-inspired dish. I had entered an idea for a different take on shrimp and grits in that contest using California Olive Ranch and Bob's Red Mill products. I had come across this delicious-looking recipe from Food & Wine for shrimp marinated in lemon and olive oil that I thought would be nice with cheese grits cakes.


Pan-Fried Cheese Grits Cakes with Lemon and Olive Oil Marinated Shrimp


Serves 2 as an appetizer


Ingredients:

  • 4 large cooked shrimp
  • lemon from half a lemon
  • 1/4 cup olive oil
  • 1/2 teaspoon dried basil
  • 2 teaspoons fresh thyme
  • salt and pepper
  • 1/4 cup stone ground corn grits
  • 1 cup water
  • 1 teaspoon Kosher salt
  • 1 teaspoon Old Bay
  • 1/2 - 1 cup extra sharp cheddar, shredded
  • flour
  • 1 egg, beaten
  • Panko breadcrumbs
  • soft breadcrumbs
  • 1 teaspoon chopped fresh thyme
  • 1/2 teaspoon dried basil


Directions:

  1. Make the cheese grits by bringing 1 cup of lightly salted water to boil and add the corn grits, lowering the heat to low. Stir frequently to be sure that it doesn't stick. Careful, like oatmeal, bubbles might burst out and splatter you with wicked-hot starchy grain. 
  2. After about 10 minutes, add 1/2 teaspoon of Old Bay. Stir well and let cook another 15 - 20 minutes.
  3. Once it has cooked through and is the thickness you like, add the shredded extra-sharp cheddar, starting with 1/2 cup and adding up to 1 cup to suit your taste - I used about 3/4 cup. Stir well to let the cheese melt, then remove from heat. 
  4. Place a long piece of waxed paper in a plastic container so that the ends hang out of the sides - this will let you remove the grits easily when they've set up - pour the grits into the container and out in the fridge for at least 4 hours.
  5. Mix together the cooked shrimp in the olive oil, lemon juice, thyme, basil and salt and pepper. Let marinate in the fridge for at least an hour.
  6. When you are ready to make the grits cakes, set up 4 bowls, one with flour, one with a beaten egg, one with panko mixed with thyme and basil, and one with soft breadcrumbs.
  7. Take the grits out of the fridge and lift them out of the container and set them on a cutting board. Cut out rounds using a a biscuit cutter and dredge them in flour, dip in beaten egg, and then passing through the breadcrumbs, first the panko and then the soft crumbs, to fill in the gaps that the panko crumbs missed.
  8. Fry in hot peanut oil until golden brown on both sides, drain on a paper towel and then serve with the marinated shrimp.


A closer look...


Wednesday, December 7, 2011

Fried Goat Cheese on Roasted Golden Beet and Savory Cracker

We do love our appetizers around here, often making a meal out of a choice of finger foods, dips and spreads with fresh bread. In addition to the usual array of cheeses, I like to have a more elaborate or interesting choice or two to allow me to test out new ideas. Plus, it's always a good way to get the kids to try out new things.

I especially love the combination of beets and goat cheese. The goat cheese & roasted beet amuse bouche is the most-viewed blog entry here, and for good reason: the roasted beets offer a wonderful sweetness, which is the perfect foil for the smooth and tangy goat cheese. Breading and pan-frying the goat cheese rounds seems to bring out the creaminess of the cheese as well as adding a wonderful new texture. I put it on a savory cracker to make it a little easier to eat as a finger food.

The end results provides a rich combination of smooth and crunchy, creamy and tangy, sweet and savory. Not bad for an appetizer.


Fried Goat Cheese on Roasted Golden Beet and Savory Cracker


Ingredients:
  • 1 golden beet
  • olive oil
  • salt
  • pepper
  • log of herbed goat cheese
  • flour
  • egg
  • panko bread crumbs
  • fresh thyme, chopped
  • soft bread crumbs
  • peanut oil
  • savory cracker, wasa bread or some other thin and crisp flatbread or cracker

Directions:
  1. Roast the beet: Preheat the oven to 400 F. Pour a thin layer of olive oil in a bowl. 
  2. Wash and scrub the beet carefully, then roll it in the oil until it is all coated. Sprinkle some freshly cracked black pepper and sea salt over it and then place it on a sheet of aluminum foil and seal it up into a packet. 
  3. Place into a roasting pan and roast for 45 minutes. 
  4. Take out and let cool. Slip off the skin and then slice into 1/2 inch slices.
  1. Make the pan-fried goat cheese rounds: Grab four shallow bowls, pie tins or plates. Pour out about 3/4 cup of flour on one, the beaten egg on the middle plate, the panko bread crumbs mixed with fresh thyme leaves on the third, and unseasoned soft bread crumb on the fourth.  
  2. Slice the goat cheese into 3/4 inch rounds and then squish them down slightly until the diameter of the round almost matches the diameter of the beet slices. 
  3. Working one at a time, dredge the goat cheese rounds through the flour until it is all coated, then dip into the beaten egg, making sure to let the excess egg drip back into the plate. Then press into the panko and thyme on both sides, then dipping it into the soft breadcrumbs to cover what the panko missed.
  4. Heat some peanut oil over medium-high heat in a skillet. Once the oil starts to shimmer, carefully lower the goat cheese rounds into the oil and fry until both sides are golden brown, once per side is best. Remove to a plate lined with paper towels to drain.
  5. Place a slice of the roasted beet on a cracker and top with a goat cheese round and serve.


A closer look at the melty cheese....


Tuesday, December 6, 2011

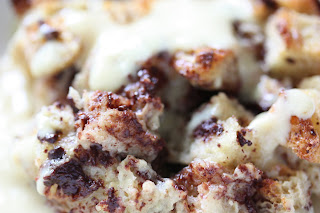
Bourboned-up Eggnog Bread Pudding

'Tis the holiday season.

Although for some people that may mean the joy and fellowship of gift-giving and shared meals, for other people that may mean stress and insanity associated with gift-giving and shared meals. For still others, it is a mixed bag of both joy intertwined with stress, fellowship commingling with insanity.

It's no wonder so many people spike their eggnog during the month of December.

A friend of mine talked about a bourbon-spiked eggnog he made and I read something recently about an eggnog bread pudding based on this White and Dark Chocolate Bread Pudding from Eupicurious, and my ears perked right up. All signs seemed to indicate that I would smash the two together in some sinful way.

As luck would have it, I had just bought a quart of eggnog the other day on impulse, and just yesterday when I was rummaging through the fridge, I came across a bag of the bits and pieces of a few recently purchased, but never finished, baguettes. Leftover bread like that usually gets stuffed into a ziplock bag and stored in the freezer for future use as bread crumbs, but for some reason, these baguettes had escaped to the back of the fridge until Sunday, when I sliced off the crusts and let the baguettes fulfill their life's ambition of being mixed with chopped chocolate, drowned in egg, bourbon and cream, and then baked to golden-brown deliciousness.

I didn't stop there. I made a custardy sauce of eggnog, cream and bourbon as the final touch.

Let me tell you, it makes the stress and insanity of the season just a wee bit more bearable.


Bourboned-up Eggnog Bread Pudding


Serves 2 generously or 4 or even 6 judiciously - don't even attempt to eat the whole thing by yourself 

Ingredients:

For the sauce:
  • ½ cup eggnog
  • splash of heavy cream - 2 or 3 tablespoons
  • generous 2 tablespoons bourbon - it may have been closer to 3 or even 4 tablespoons 
  • 1 tablespoon sugar
  • splash of vanilla
  • touch of nutmeg
  • ½ teaspoon cornstarch
  • ½ teaspoon water
For the pudding:
  • 3½ cups leftover French bread cut into 1 inch cubes, crusts cut off - stale is ok, moldy is not
  • 1½ oz. bittersweet chocolate, chopped - I used Scharffenberger's 70% cacao bittersweet chocolate
  • 1 oz. good quality white chocolate, chopped
  • 1 egg
  • 2 tablespoons sugar
  • ½ cup heavy cream
  • ¼ cup egg nog
  • 1/8 cup milk
  • 1/8 cup bourbon
  • 1/8 teaspoon nutmeg
Directions:
  1. Make the sauce by placing the eggnog, cream, sugar, vanilla, nutmeg and bourbon in a saucepan and heat to a gentle boil.

  2. Make a slurry of the cornstarch and water, whisking it well until it is smooth and then add it to the eggnog-cream mixture. Keep it bubbling gently over medium to low heat, stirring constantly until it thickens, about 3 minutes. Take it off the heat, stir in the nutmeg and cool. Refrigerate until needed.

  3. For the bread pudding, I like to go beyond even day-old bread and use stale French bread. Very simply, I cut off the crusts and then cut the bread into 1 inch cubes. Toss that into a large bowl.

  4. I was feeling lazy, so I chopped the chocolates in the food processor. It made a hell of a racket, but it was great - I had chunks of chocolate as well as "chocolate dust." Add the grated/chopped/pulverized chocolate to the bread cubes.

  5. Beat together the egg, sugar and vanilla until frothy, then add the cream, eggnog, milk, nutmeg and bourbon, whisking well. Pour the liquid over the bread and chocolate and stir well. Let it soak for 30 minutes, stirring occasionally to make sure that it all soaks evenly.

  6. Preheat the oven to 350 F. Find a smallish casserole dish. I used an oven-safe 5 x 7 inch stoneware dish for this amount of bread pudding. Give it a good spray with cooking spray and dump in the soaked bread pudding mixture. Sprinkle a bit of brown sugar over the top if you like, and then bake for 30 minutes or until the edges of the bread cubes are brown and the custard is set.

  7. Take out and let cool 10 minutes, then serve warm with the eggnog sauce spooned over it.


A closer look...


Monday, December 5, 2011

Fried Catfish Strips

A Syracuse, NY favorite, Dinosaur Bar-B-Que has a menu that will have you drooling all over yourself  before you even get to the entrees. I could happily make a meal of the appetizers and sides alone. Their Cuban-style black beans and rice are absolutely sublime, there is no other word for it, and the cucumber and tomato salad adds that note of freshness that rounds out whatever big heavy hunk o' smoked meat you may have on your plate.

If I were to make a meal of the appetizers, I'd have to start with their Fried Green Tomatoes, really the best use for green tomatoes that I know of. The contrast of the crispy cornmeal coating and the still-firm and green tomato are as perfect a combination as malt vinegar and salt are for fries. Every time I bite into one, I get that zing at the back and sides of my throat. Love that.

Next up would be the drunken spicy shrimp boil, which features one of my favorite spice mixtures, Old Bay. You could put Old Bay on just about anything and I'd probably eat it. Well, except for offal. I doubt anything could dress up tongue or kidneys so that I'd find them appetizing.

Finally, my favorite app, catfish strips. I would gladly eat these every day. True story, I'd never had catfish before my fist visit to Dinosaur. I guess that the pre-seasoned catfish fillets I saw in the market never looked appealing to me. Well shame on me. Catfish is wonderful, especially soaked in buttermilk, crusted with cornmeal and fried.

This is not, as far as I know, the exact recipe they use at Dinosaur*, but it is pretty easy and yields delicious, crispy and nicely seasoned catfish strips, perfect for a snack, a sandwich or a meal.


Fried Catfish Strips


Ingredients:
  • ½ lb. fillet of catfish, cut into 4 strips
  • 1 - 1½ cups buttermilk
  • ½ cup cornmeal
  • 1¼ cup all-purpose flour
  • 1 tablespoon Old Bay
  • peanut oil for frying
Directions:
  1. Put the catfish strips in a plastic container with a lid and pour in enough buttermilk to completely cover them. Cover securely and put in the fridge to marinate for 2 hours.
  2. Once the fish has finished marinating, mix together the cornmeal, flour and Old Bay in a shallow dish or pie plate. Take the fish out of the buttermilk and dredge in the cornmeal mixture until thoroughly covered. repeat with all catfish strips and set aside on a plate.
  3. Heat a 1/4 inch of oil in a skillet. When the oil starts to shimmer, carefully place each piece of fish into the oil and cook until light golden brown, about 4  - 5 minutes, then flip until the other side is also a nice light golden brown. Turn again and let the fish cook on each side another few minutes, letting the crust develop a deeper golden brown color. Whether or not the fish is cooked through depends on how thick the pieces are. Don't be afraid to cut into it to check if you aren't sure. The fish interior should flake with a fork and have lost its translucence. All told, my fish cooked for about 12 minutes total.
  4. Take out and let rest on a plate lined with paper towels to absorb some of the extra grease, then serve with your favorite tartar sauce. I like a simple mix of mayonnaise, sriracha and Old Bay.

Notes:

Sunday, December 4, 2011

Semolina, Olive and Rosemary Focaccia

Yesterday I came across a contest sponsored by California Olive Ranch and Bob's Red Mill for recipes featuring their products - or so I thought when I first glanced it over. Call me bad, I have a problem with skimming. I checked out a variety of recipes through Google for inspiration, but didn't find exactly what I wanted, so I thought, "Well hell, I'll improvise."

So I hustled my ass right into the kitchen, worked some of that culinary alchemy that bakers live for, and a few hours later, I had this: Semolina, Olive and Rosemary Focaccia.

When I sat back down at my computer to enter the contest, munching on the delicious focaccia I might add, I saw that they only wanted ideas for combining their products, not actual recipes.

*dope slap*

What the hell, I entered anyway, and as a bonus, I have a very lovely recipe for a savory focaccia made from semolina.

Semolina, Olive and Rosemary Focaccia


Ingredients:

  • 1-1/3 cups water
  • 1/3 cup olive oil
  • 2 cups bread flour
  • 1-1/2 cups Bob’s Red Mill Semolina Flour
  • 1 tablespoon vital wheat gluten
  • 1-1/2 teaspoon salt
  • 2-1/4 teaspoons active dry yeast
  • Pinch of sugar
  • ¼ cup chopped kalamata, oil-cured, green and Greek black olives, mixed
  • 2 tablespoons chopped fresh rosemary
  • 1 tablespoon sea salt or kosher salt
  • 1 tablespoon chopped fresh rosemary
For thte rosemary-infused olive oil:
  • ½ cup olive oil
  • 5 sprigs fresh rosemary

Directions:

  1. Sift together the vital wheat gluten and bread flour in a small bowl and set aside.
  2. In a large bowl, mix together the semolina and salt.
  3. Heat the water to 110 F and add the sugar and yeast. Let sit until foamy, about 5 minutes. Then make a well in the center of the semolina and pour in the proofed yeast mixture and the olive oil.
  4. Stir well to combine and add the bread flour and gluten mixture ½ cup at a time, stirring well after each addition.
  5. Once the flour has been mixed in and the dough has come together to form a rough mass, dump it out onto a floured surface and knead for 8 minutes, then fold in the chopped mixed olives and 2 tablespoons of rosemary.
  6. Continue to knead until the olives and rosemary are well incorporated and the dough is smooth and elastic, about 10 minutes, adding more flour as needed to keep the dough from sticking to your hands.
  7. Cover with a kitchen towel and let rise in a warm spot for about an hour, or until doubled in size.
  8. Make the rosemary-infused olive oil: combine ½ cup olive oil and 5 sprigs of fresh rosemary in a pan and cook over low heat for about 5 minutes, then take it off the heat, let cool and put into a container and refrigerate until needed.
  9. Preheat the oven to 400 F and prepare a 9 x 13 inch baking sheet by coating it with a thin layer of olive oil. When the dough has doubled in size, punch it down to deflate it, then press it to fit into the baking sheet, making indentations with the tips of your fingers to create dimples in the dough.
  10. Cover with a towel and let rise a second time for 45 minutes.
  11. Remove the towel, drizzle 1 tablespoon of rosemary-infused olive oil over the dough, then top with another tablespoon of chopped rosemary and sprinkle with sea salt, then bake for 20 – 25 minutes or until golden brown.
  12. Let cool on a wire rack, warm the rosemary-infused olive oil in the microwave and then serve the focaccia warm with the dipping oil.

Bread machine directions:
  1. Place the ingredients in your bread machine according to the manufacturer's specifications, set it to the dough cycle and walk away until step 8.
  2. Make the rosemary-infused olive oil: combine ½ cup olive oil and 5 sprigs of fresh rosemary in a pan and cook over low heat for about 5 minutes, then take it off the heat, let cool and put into a container and refrigerate until needed.
  3. Preheat the oven to 400 F and prepare a 9 x 13 inch baking sheet by coating it with a thin layer of olive oil. When the dough has doubled in size, punch it down to deflate it, then press it to fit into the baking sheet, making indentations with the tips of your fingers to create dimples in the dough.
  4. Cover with a towel and let rise a second time for 45 minutes.
  5. Remove the towel, drizzle 1 tablespoon of rosemary-infused olive oil over the dough, then top with another tablespoon of chopped rosemary and sprinkle with sea salt, then bake for 20 – 25 minutes or until golden brown.
  6. Let cool on a wire rack, warm the rosemary-infused olive oil in the microwave and then serve the focaccia warm with the dipping oil.

Saturday, December 3, 2011

Hasselback Potato

I'd been looking for something new to do with potatoes and came across these elegant potatoes which allegedly originated in Sweden at the Hasselbacken restaurant in Stockholm. The images I came across showed them with skins on, like mine, and skins off and garnished with a variety of toppings. The prep was rather time-consuming, but I enjoyed the visual end result and thoroughly loved the crispy edges with the soft and fluffy potato interior.

Next time, I'll try peeling them and really dousing them with olive oil and see what happens.


Hasselback Potato


Serves 1


Ingredients:
  • 1 russet potato
  • 1 clove garlic
  • 1 shallot
  • fresh thyme
  • fresh rosemary
  • salt
  • pepper
  • olive oil
  • butter
  • parmesan 
Directions:
  1. Preheat oven to 425° F
  2. Scrub the potato very clean and then with a sharp knife, slice the potato into very thin slices, being careful not to cut all the way through.
  3. Slice the garlic and shallot into paper-thin slivers and carefully put them in between the potato slices. I alternated the garlic and shallot slivers.
  4. Chop the rosemary and thyme and slip them in between the potato slices.
  5. Brush the potato with olive oil, grind some salt and pepper over the top, sprinkle a few more chopped herbs on top and bake for approximately 60 minutes or until some of the edges start to crisp up. Place small pats of butter and sprinkle some parmesan on top and serve.

Notes:

  • This recipe, though time-consuming and painstaking, is very easy to adapt to however many people you have to feed. Allow extra time for assembly though, because it can become quite an involved process.

Friday, December 2, 2011

Wienerschnitzel

I've been having serious comfort-food cravings lately, and few things are more homey or comforting for me than German food. A platter of Schnitzel or Sauerbraten with Spätzle, Rotkohl, and Kartoffelpuffer, is practically Gemütlichkeit on a plate.

The kids have been asking for a German dinner, and I got a good price on veal cutlets the other day, a package of two large cutlets which I'd cut in two for more reasonable portion size. Since there are three of us, instead of cooking up four of the small cutlets and then having all three of us fight to the death for the last schnitzel, I cooked one up for my lunch yesterday. Win-win.

Since the cutlet is pounded so thin  - technically this is called a "paillard," escalope," or "scallop" - the schnitzel cooks really quickly, so it's a good idea to have everything else ready to go in serving bowls and even already set on the table before you fry the schnitzels. Then all you have to do is just stick them on a plate and run into the dining room and eat them while they're hot. The crispy, hot breading encases the tender meat and the little bit of lemon juice and parsley add a brightness that simply makes your tongue sing. :)

Guten Appetit!

Wienerschnitzel


Ingredients:
  • veal cutlets, pounded to at least 1/4 inch thickness
  • flour
  • 1 egg, beaten
  • unseasoned, soft breadcrumbs
  • peanut oil for frying
  • lemon slices
  • chopped parsley
Directions:
  1. Set up three shallow bowls (I use pie pans) with flour in one, beaten egg in the next, and breadcrumbs in the third.
  2. Make sure your cutlets are pounded very thin- at least 1/4 inch thick, thinner if you can manage it without tearing holes in the meat. Pat the cutlets dry. 
  3. Working one cutlet at a time, dredge it in flour very well so that it is completely coated. Shake off the excess flour and dip the cutlet in the beaten egg and then pass through the bread crumbs. Don't press the crumbs down into the egg, but make sure that the entire cutlet is totally covered. Repeat with other cutlets and let them rest on a plate.
  4. Heat a good 1/4 inch of peanut oil in a large skillet to medium-high - it seems like a lot of oil, but I've found that it is the key to keeping the breading from sticking and burning. It also gives you a lovely puffed-up crust.
  5. Once the oil starts to shimmer, carefully put the cutlets into the oil. Don't crowd the pan, though. You can do this in batches of 2 cutlets at a time if you have to. 
  6. Cook for 2 - 4 minutes until the breading is golden brown on the bottom and then carefully flip over (I use tongs for this) and cook until the other side is also golden brown.
  7. You're done. The thinner cutlets cook really fast. Garnish with lemon slices and chopped parsley and serve.

Thursday, December 1, 2011

Slow-Roasted Duck Leg

For some odd reason lately, everyone seems to be talking about duck, whether it's duck confit, almost duck confit, or spicy duck empanadas with fire sauce and cilantro cream. Actually, I just got duck confit on the brain last week and then everywhere I turned, I saw people mentioning duck. I saw that Wegmans had single servings of duck legs from Maple Leaf Farms, and I wanted to cook something a little bit decadent for myself, I thought I'd go for it.

I'd read about duck confit and knew that I was not in the mood for a time-consuming, multi-stage process, so I decided to try out the slow-roasted duck recipes. I found a wide degree of temperature variation between the recipes, so I thought I'd just use the lowest setting on my oven and just wing it.

Well, hell. Duck is amazing, no joke.

I cooked it low and slow at 200° F for 3 hours and then raised the temp to 250° F for the final hour or so of cooking. When it was done, the house had that warm, cozy smell of a roasted bird, but richer, and it looked absolutely incredible. Even though everything I'd read about the duck indicated that it would release a ton of fat, I could not believe how it actually seemed to be swimming in a pond of golden fat.

See what I mean?


And yes, I did what people everywhere recommend and I saved that fat.


Apparently potatoes crisped up in duck fat are nothing short of revelatory. Well, yeah, I have to try that!

I had planned on making an orange sauce as a kind of play on combining two iconic dishes for an (Almost) Duck Confit a l'Orange, and  whipping up a puree from roasted garlic and Jerusalem artichokes, but in the end I just ate the duck by ripping all the meat off the bones as I stood in the kitchen. What blew me away about it was the texture. The meat was actually silky, and the skin crispy. Sadly, I had no duck meat left over for even a single spicy empanada. Maybe next time.


Slow-Roasted Duck Leg


Ingredients:
  • duck leg
  • 1 tablespoon kosher salt
  • thyme
  • olive oil

Directions:
  1. Set the duck on a cutting board and with the tip of a very sharp blade or a sterilized safety pin, poke holes through the layer of skin and fat. Be very careful not to piece the meat. These holes allow the fat some escape routes, which helps crisp up the skin.
  2. Rub the salt all over the duck and let sit at room temperature for a half hour.
  3. Brush off about half the salt and pat the duck dry. There will still be salt on the duck, that's just fine.
  4. Place a small coating of olive oil into a small casserole dish and set the duck inside, skin-side up. lay some sprigs of thyme on the duck.
  5. Put in a cold oven and turn the heat to your lowest setting. I was able to go to 200° F. Roast for 3 hours, then increase the heat to 250° F and roast until the internal temperature at the leg joint reaches 175° F. It took about another hour and 45 minutes to get to that temperature.
  6. Let rest for 5 minutes and then serve.
Related Posts with Thumbnails