Monday, May 30, 2011

Pulled Pork Sandwich

This holiday weekend is the traditional kick-off of summer, as they like to say. For lots of people that means cookouts, barbecues, drinks and parties. Alas, I have no grill - my ex-husband took it with him when he left. I have no real outdoor dining area, no deck or patio. Some day I'd love a large patio with plenty of room to host cookouts. I daydream about the killer grill and smoker I'd have.

But I digress. I got pulled pork on my brain earlier this week. I may not have a grill or a smoker, but I do have a crock pot. I knew I could could cook the hell out of a pork butt in a large crock pot and with the right spice rub and barbecue sauce, I could recreate some cookout favorites right in my kitchen.

Results don't lie - this meat was tender and flavorful, and the sauce added a lovely sweet and tangy zing.


Pulled Pork Sandwich


Ingredients:
  • 6 - 8 lb. pork butt (pork shoulder, preferably bone-in)
  • Spice Rub (recipe below) 
  • 1 onion, quartered and separated into layers
  • 1/2 cup water
  • 1/2 t Liquid Smoke
  • BBQ sauce - Use your favorite jarred brand or make your own. My recipe follows
  • Creamy coleslaw - Recipe follows
  • Buns

Directions:
  1. Make the spice rub and place the pork butt in a large bowl. Coat the meat with all of the spice rub, massaging it into the surface. Wrap in a double-thickness off plastic wrap and place in a large bowl and refrigerate 12 hours.
  2. Place the onion sections in the bottom of a large crock pot with the water and Liquid Smoke. 
  3. Unwrap the meat and put it in the pot and turn the heat to low, cover it and let cook about 10 hours or until the meat is fork-tender and falling off the bone. For smaller piece of meat, start checking at about 8 hours. This 8 pounder cooked for a full 10 hours. Crock pots vary in how hot their settings are, so be sure to check.
  4. Take the meat out and place it in a large pan - I used a disposable lasagna pan. Discard the liquid in the crock pot.
  5. Remove the bone and the fat and discard. Then pull the meat into shreds with two forks, or cut it with a knife and fork.
  6. Put the shredded meat back in the crock pot along with 1 - 2 cups BBQ sauce. Stir to coat and warm up on the lowest crock pot setting, ten serve on a bun with more BBQ sauce and coleslaw.


Spice Rub


Ingredients:

  • 4 T paprika
  • 2 T chili powder
  • 2 T dark brown sugar
  • 2 T table salt
  • 2 T cumin
  • 1 T granulated sugar
  • 1 T oregano
  • 2 t cayenne
  • 2 t thyme
  • 2 t granulated garlic
  • 1/2 t smoked paprika

Directions:
  1. Mix well.

BBQ sauce


  • Olive oil
  • 1 onion, quartered
  • 4 cloves of garlic, cut into large pieces
  • 1 28 oz. can whole tomatoes with juice
  • 1-1/2 cups ketchup
  • 1 cup orange juice
  • 6 T fresh lemon juice (2 lemons)
  • 6 T red wine vinegar
  • 1/2 cup water
  • 2 T Liquid Smoke 
  • 1/4 cup honey
  • 1/4 cup packed dark brown sugar
  • 2 T dark molasses
  • 1 T Worcestershire sauce
  • 1/4 t hot pepper sauce -I like Cholula
  • 2 T chili powder
  • 1 T ground coriander
  • 1 T dry yellow mustard powder
  • 1 t granulated garlic 
  • 1 t salt
  • 1/4 t smoked paprika
  • small knob of dried chipotle chili

Directions:
  1. Saute the onion in olive oil over medium-high heat until the edges start to brown up, then add the garlic chunks and saute for another minute.
  2. Add the remaining ingredients, stir well and bring to a boil.
  3. Reduce heat and simmer for an hour, uncovered. Stir occasionally to make sure the mixture doesn't stick and burn.
  4. Fish out the knob of chipotle pepper and puree the sauce with a stick blender or in small batches in the blender.
  5. Taste to adjust seasoning, adding more hot sauce or a pinch more cayenne if you want it spicier.
  6. Cool to room temperature and store, refrigerated, for up to 1 week.

Creamy Coleslaw

Ingredients
  • 1/2 head large green cabbage
  • 2 carrots
  • 1/2 large vidalia onion
  • 3/4 cup mayo
  • 2 heaping T creme fraiche or sour cream
  • 2 T sugar
  • 2 T white vinegar
  • 1 T mustard powder
  • 2 t celery seed
  • 1 t salt
  • 1/8 t black pepper
Directions:
  1. Shred the carrots and onion with the shredding disc of a food processor.
  2. Put in a large bowl and add the mayo, creme fraiche, vinegar, sugar, salt, pepper, mustard and celery seed. Mix well.
  3. Shred the cabbage with the same disc and add the cabbage to the mix, stirring well.
  4. Serve.

Thursday, May 26, 2011

Spaghetti and Meatballs

My sister is on bedrest in the final stages of her pregnancy, so for the past 2 weekends, I've brought over some meals for her to make foraging for food a bit easier. This past weekend, I figured it would be easier if I just invaded her kitchen and made the food there rather than trying to find some way of transporting gallons of sauce and meatballs.

When I was driving there, for some reason, I had that line from the old Alka-Seltzer commercial running through my head "That's a spicy meatball!"

Anyone else remember that gem from the 1970s?


However, for some reason, I kept hearing the line in Father Guido Sarducci's voice, remember him? Another gem from the 1970s/early-1980s.


So there you go, a little glimpse of the craziness inside my head. :)

I make spaghetti and meatballs fairly regularly now. My kids are thankfully past the picky-pasta phase. When they were younger, the only way they would accept spaghetti was coated with butter and parm cheese. They were vehemently anti-tomato sauce, which mystifies me. Tomatoes are one of my favorite foods in all of its forms, sauce, dried, fresh and raw. A thick sauce, perfectly seasoned is a joy all on its own. I have, in fact, been known to skip the pasta and just eat a bowl of sauce, with garlic bread to sop up the remainders, of course!

This recipe is double what I usually make, so feel free to halve it if you feeding fewer hungry mouths.


Spaghetti and Meatballs


Makes approximately 30 meatballs and 12 cups of sauce

Ingredients:
  • 3 slices stale sandwich bread
  • 1/3 cup milk
  • 1/4 cup bread soft crumbs (NOT panko style)
  • 1/2 cup onion, chopped fine
  • 1/3 cup freshly grated parm
  • 3 cloves garlic, minced or put through a garlic press
  • 1/4 cup flat-leaf parsley (also called Italian parsley), chopped
  • 5 leaves of fresh basil, chopped (about 2 T, loosely packed)
  • 1 t granulated garlic
  • 2 t sea salt, kosher salt or other large-crystal salt
  • 1 t black pepper
  • 2-1/2 lb. of ground meat - I like 1 lb. of straight ground chuck and about 1-1/2 lb. of what they call a "meatloaf mix" here, which is a combination of beef, pork and veal; sometimes I use ground turkey
  • 2 large eggs, beaten
  • 1/2 cup bread crumbs
  • 1/4 cup grated parm
  • 1 T Italian seasoning
  • 12 cups of marinara sauce
  • spaghetti, cooked

Directions:
  1. Tear the bread into very small pieces or grate it with a box grater and soak it in the milk for about 10 minutes. 
  2. Add the bread crumbs and stir well. 
  3. Add the onion, garlic, grated parm, parsley, basil, granulated garlic, salt and pepper and mix well.
  4. Add the meat and - here's the fun part - squish it all together with your very clean hands. Be sure to mix everything very well.
  5. Add the 2 beaten eggs and squish some more until it is all one huge gloppy mess.
  6. Mix together 1/2 cup bread crumbs, 1/4 cup grated parm and 1 T Italian seasoning in a bowl.
  7. Grab a piece of meat mixture and roll into a golfball-sized ball. Take a little bit of the crumb mixture in the palm of your hand and roll the meatball in it. You don't want these meatballs coated so that they're breaded, but you want a bit of a dusting on them.
  8. Place the shaped meatball on a large plate.
  9. Repeat about 30 more times.
  10. Cover the meatballs with plastic wrap and put in the fridge to sit for 1 hour. 
  11. You can bake them in a preheated 400-degree oven for 15 minutes or saute them in olive oil until browned.
  12. Once they're browned, add them to the pot of simmering sauce and let cook for another 45 minutes.
  13. Serve over spaghetti.

Marinara Sauce

makes about 12 cups of sauce

Ingredients:
  • olive oil
  • 1 cup coarsely chopped onion
  • 6 large cloves garlic, chopped
  • 3 T minced sundried tomato (I prefer the oil-packed ones)
  • 4 T tomato paste  
  • 4 (28 oz) cans of whole roma/plum tomatoes in juice 
  • Granulated garlic  
  • Italian seasoning
  • Dried basil
  • salt and pepper
  • pinch of sugar 
  • Fresh basil for garnish
Directions:
  1. In a large pot heat about 2 T olive oil over medium-high heat until it shimmers.
  2. Add the onion and saute until it is soft and translucent.
  3. Toss in the chopped garlic and minced sundried tomato and cook until the garlic is fragrant, not burned, about 2 minutes.
  4. Add the tomato paste and stir really well together, breaking down the clump of tomato paste as best you can.
  5. Pour in the 4 cans of whole tomatoes, juice and all and with the flat end of a spatula or your trusty wooden spoon, mash down the tomatoes a little bit. 
  6. Cover, reduce the heat to low and let cook for about an hour. Stir it occasionally to make sure that the tomatoes aren't sticking and burning to the bottom of the pot.
  7. Add some seasoning. At this point I start with 1 T of dried Italian seasoning, 2 t dried basil, a pinch to 1/2 t of sugar, 1 t salt, a few grindings of cracked black pepper and 1 t granulated garlic (my new favorite seasoning agent ). 
  8. Stir thoroughly, let cook covered another 10 minutes and taste again and season until it's about where you want it.
  9. Cover and let cook another hour, stirring occasionally.
  10. After it has cooked for about 2 hours, puree it, either with your handy-dandy stick blender or in small batches in a blender or a food processor. If I had to choose between those two, I'd say go for the blender.
  11. Once the sauce is all pureed, it'll be nice and thick. Taste again for the final seasoning adjustment and if you are not using it for meatballs, let the sauce cook another hour and then serve.
  12. If you are using this sauce for the spaghetti and meatballs recipe, now is when you'd add the browned meatballs.

Notes:
  • This sauce is phenomenal with pasta, on pizza, over spaghetti squash or in a lasagna. Half of this recipe (6 cups) works well in my lasagna, cooked in a 9 x 13 in. pan. (recipe to come)
  • This recipe does freeze very well, if you do make the full amount.
  • This recipe halves and even quarters very well for smaller meals.

Wednesday, May 25, 2011

Coconut-Curry Tofu and Jasmine Rice

Day 2 of living out of my pantry was a success. I had a can of coconut milk I wanted to use up, and my favorite use for that is usually some sort of curry. I usually make a coconut-curry jasmine rice in which you cook the rice in the coconut milk which is to-die-for delicious (recipe to come), but I wanted to make a creamy curry sauce with the coconut milk instead.

Since I was feeling sort of vegetarian-ish, I rummaged around in the freezer for a block of tofu for my protein and pretty quickly got this meal together - once the tofu had thawed and all the excess moisture had been pressed out. The tofu cubes really sucked up the sauce; in the end, they were like little coconut-curry sponges, very tasty. Using the toasted coconut shreds in the coconut milk really amped up the coconuttiness, but I think that it works well with the other flavors, especially the peanut and lime.

If fat content is an issue for you, you can use light coconut milk, but don't be fooled, that still has some fat in it. You wouldn't be wrong to put chopped cilantro in the coconut milk puree which you add to the rice. I love cilantro usually, but I was out of it and was feeling too lazy to go out to the store JUST for that one item, so I said, "No cilantro today." It was just fine and tasty without it.


Coconut-Curry Tofu and Jasmine Rice


Ingredients
  • 1/4 cup unsweetened shredded coconut
  •  1 3/4 cups water
  • 1 t salt
  • 1 cup jasmine or basmati rice
  • 3/4 cup unsweetened coconut milk
  • 1 T minced fresh ginger
  • 1 T fresh lime juice
  • 2 large garlic cloves, minced
  • 1/2 t dried jalapeno flakes
  • 2 T canola oil
  • 8 ounces extra-firm tofu, pressed, drained, and cut into 1/2-inch cubes
  • 1/2 cup onion, chopped
  • 2 t curry powder
  • 1 t ground cumin
  • 1/8 t dried jalapeno flakes
  • 1/2 cup cherry tomatoes, chopped

  • hot sauce to taste
  • 2 T chopped peanuts
  • lime zest

Directions
  1. In a dry skillet over medium-high heat, toast the shredded coconut until light golden, about 5 minutes. Stir constantly and be careful not to let it burn. As soon as it starts to smell toasted and reach a nice golden color, remove it from heat and transfer to a bowl.
  2. Bring 1-3/4 cups water and salt to boil in heavy medium saucepan. Add the rice and let boil again.
  3. Reduce heat to low, cover, and simmer until all the water is absorbed, about 18 - 20 minutes.
  4. Puree 1/2 cup of the coconut milk, 1 teaspoon ginger, lime juice, and 1 clove of garlic in a blender.  Add the toasted coconut and blend for a few seconds. 
  5. Mix the coconut milk mixture into the rice and set aside.
  6. Heat some canola oil in large skillet over medium-high heat. Add the tofu cubes and saute until golden.
  7. Add the onions, curry, cumin, jalapeno flakes and the rest of the ginger and garlic. Cook for 2 minutes.
  8. Add the tomatoes and stir everything well.
  9. Serve over the coconut jasmine rice, add hot sauce to taste and top with chopped peanuts and lime zest.

Tuesday, May 24, 2011

Cinni-Minis

 I am trying to cook from my pantry for the next few weeks, designing my menu around what I already have on hand rather than shopping from a list of things I don't have. My pantry of canned goods and canisters of things may not resemble a fallout shelter just yet, but it has gotten unwieldy, so it is time to be creative and resourceful as I hack my way through the jungle that is by kitchen pantry (really just my kitchen cabinets).

I was going through the cheese drawer in my fridge the other day and found a ball of leftover puff pastry scraps. Wracking my brain, I thought that this ball of scraps could be re-purposed easily into mini cinnamon rolls. They made a fast, easy and delicious sweet snack, and there's no reason to wait until you have puff pastry scraps. I would gladly make these again using a full sheet of puff pastry.


Cinni-Minis


Ingredients:
  • Puff pastry scraps
  • melted butter
  • turbinado sugar
  • 3 T walnuts, chopped
  • 1 t cinnamon
Directions:
  1. Preheat the oven to 400 degrees Fahrenheit.
  2. Mix together the sugar, chopped walnuts and cinnamon.
  3. Press together the puff pastry scraps, folding them over onto themselves in a large ball.
  4. Place the ball on a piece of parchment paper and with a rolling pin, roll it to a thickness of 1/8 in.
  5. Brush melted butter over the surface and sprinkle the cinnamon-sugar and nut mixture over the top.
  6. Roll the pastry up like a jelly roll and brush it with more melted butter.
  7. Slice into 1/2 in. slices.
  8. Place the slices on a parchment-lined cookie sheet, and bake for 12 minutes or until nicely golden brown.

Monday, May 23, 2011

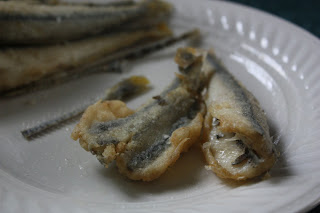
Crispy, Pan-Fried Smelts

I've never met a fish I didn't like... baked, broiled, pan-fried or battered and deep-fried. I used to love sushi, but a year spent in Korea had me overindulging on raw fish and I haven't really been able to enjoy it since. But give me a nice piece of fish soaked in a beer batter and then fried to golden-brown deliciousness and I am a happy camper.

Growing up, my grandmother used to make us a big mess of smelts, and as I recall, they were just about the best thing I'd ever eaten. It's not just the wonderful, fishy taste, but the whole experience of ripping the backbone out of the cripsy-on-the-outside-yet-tender-on-the-inside flesh and then devouring the little fishies in a bite or two - it's very satisfying and appeals to the inner savage.

I hadn't really thought about smelts much in the intervening 30 years and stopped short when I saw them in the fish case at the grocery store the other day. I bought a pound of the dressed smelts on total impulse, driven by childhood memory of weekends at my grandparents' house. It's interesting how inextricably food, smells and tastes can be bound with memory. When I was cooking the smelts yesterday, I had very clear visions of my grandparents' kitchen and dining room, almost as if I had been there just recently instead of decades ago. It was as comforting as it was delicious.

But careful, have the windows open and a fan running, or your house will smell like a Friday Night All-You-Can-Eat Fish Fry!


Crispy, Pan-Fried Smelts


Ingredients:
  • 1/2 lb. dressed smelts
  • canola oil
  • 1/2 cup flour
  • salt

Directions:
  1. Pour a goodly amount of canola pil into a heavy-duty skillet. I like my cast-iron skillet for this job. I pour in enough oil so that the bottom is fully coated with a thick layer,  maybe 1/8 in. of oil.
  2. Mix flour and a pinch of salt in a large Ziplock bag. 
  3. Toss the smelts into the bag and shake until they are totally coated.
  4. Heat the oil over medium heat. Once it starts to shimmer, carefully lay down each smelt.
  5. Fry for about 3 minutes, and then carefully turn them over - tongs are great for this job.
  6. Let them cook on the other side another 3 minutes.
  7. Serve with a bit more salt and that's it.

Sunday, May 22, 2011

Momofuku Crack Pie in Miniature, My Version

I don't have an especially pronounced sweet-tooth; I am much more inclined to reach for something salty and crunchy or savory than run for a piece of cake or a handful of cookies, but I'm always interested in what tastes good. After hearing all the web-hubbub about the Crack Pie from Momofuku Milk Bar, I figured I had to check it out.

The recipe cited by the L.A. Times uses an oatmeal-cookie base for the shell, but to suit my taste, I knew I had to use a less-sweet crust, so I made a tartlet shell out of bittersweet chocolate and walnuts. I also am only baking for 1, so I halved, then quartered, then eighthed the recipe and adjusted it a bit and ended up with 2 miniature tarts.

The end result was total indulgent deliciousness, especially after it had been refrigerated overnight (and devoured for breakfast on this Post-Rapture Sunday), though my idea of food whose addictive qualities borders on crack is still going to be something on the order of a bowl of fresh guacamole with homemade tortilla chips or a big mess of cooked potatoes.

The filling is a lot like a pecan pie filling, minus the pecans, or like some chess pies I've had. Very silky when eaten warm; dense and smooth when cold. I am pretty sure that my kids will love these when I make them again, though I may have to sweeten the crust a bit for them since they are not as enamored of dark chocolate as I am.


Crack Pies in Miniature


makes 2 mini tarts


Ingredients:

For the tart shell
  • 1/4 cup flour
  • 3 T walnuts
  • 2 T confectioner's sugar
  • 1 T unsweetened cocoa
  • 1 T espresso powder
  • 2 T unsalted butter, cut into 1/2 in. cubes
  • 1 yolk
For the filling
  • 3 T brown sugar
  • pinch of salt
  • 2 t powdered milk
  • 4 T unsalted butter, melted
  • 1-1/2 T heavy cream
  • splash of vanilla extract
  • splash of bourbon
  • 2 yolks
Directions:

Make the tart shell
  1. Preheat the oven to 350 degrees Fahrenheit.
  2. In the food processor, pulse the walnuts, flour, confectioner's sugar, cocoa powder and espresso powder until the nuts are finely ground.
  3. Add the butter and pulse until the mixture has the consistency of coarse crumbs.
  4. Add the yolk and pulse until the mixture is crumbly.
  5. Divide the dough into 2 pieces.
  6. Spray 2 miniature tart pans with cooking spray and pat the dough into the pans. This is a very sticky dough, so I dipped my fingers in a bit of flour first.
  7. Press some non-stick foil into the pans over the top of the crust and bake for 20 minutes.
  8. Take out the pans and let cool.
  9. Lower heat to 325 degrees Fahrenheit.
Make the filling:
  1. Whisk together the brown sugar, milk powder and salt, making sure that there are no clumps.
  2. Add the melted butter and cream and stir until all the dry ingredients have dissolved.
  3. Whisk in the egg yolks and stir to combine, but don't over-beat the mixture.
  4. Pour into crusts and place the pans into a roasting pan and pour in boiling water until it's about halfway up the outside of the tart pans.* (See Notes)
  5. Bake for 12 minutes, then lower heat to 300 degrees Fahrenheit and bake another 8 minutes or until the center has just set. It should still be jiggly.
  6. Take out and let cool. Chill in the fridge, even better.
  7. When you're ready to serve it, sift confectioners sugar over the top.


Notes:
  • My tart pans are the kind with removable disc-bottoms, so since they're n a water bath, it is important to wrap the outsides with foil so that none of the water seeps in. If you have 1-piece tart pans then there is no need to wrap them. I made the mistake once of baking a cheesecake in a springform pan without wrapping the pan before putting it into the water bath.

    Yikes.

Saturday, May 21, 2011

Green Pea and Saffron Risotto

Risotto is one of my "feelin' fancy" comfort dishes. The end result can be elegant or homey, and the process of making it is fairly involved, what with the constant attention and stirring. It's nice too, because it's so simple to make for one person. It's better that way too, because I've found that risotto, like fettucini alfredo, does not reheat well. I mean, don't get me wrong, it's still edible, and delicious, but the I think that the texture is drastically different.

Risotto is also a classic example of how quality ingredients can make all the difference in the world. Sure, you can whip together a cheesy-rice concoction of long-grain rice finished with parm-from-a-green-can, and while it would have the starchy comfort of rice and the umami-ness of the powdered parm, it won't have the same creaminess. The first real risotto I had was damn-near transcendent, and I've loved them ever since.


Green Pea and Saffron Risotto


Ingredients:
  • 1 T butter
  • 1 T olive oil
  • 1/4 cup chopped onion
  • 1/2 cup rice - Arborio, Vialone Nano or Carnaroli (see Notes)
  • 1/4 cup white wine
  • pinch of saffron
  • 2 cups chicken broth, simmering over low heat
  • 1/4 cup green peas, cooked
  • 1/4 cup freshly grated parmigiano reggiano plus more for garnish
  • salt and pepper (optional)

Directions:
  1. Heat the chicken broth in a pot and keep at a low simmer.
  2. In a large saucepan, melt the butter and olive oil over medium-high heat. Add the chopped onion and cook until the onion is soft.
  3. Add the rice and stir to coat well. Cook the rice for about 2 minutes, then add the saffron and the wine. Stir well , and once the wine has been absorbed by the rice, start adding the chicken broth 1 ladleful at a time, adding more as the liquid is absorbed and stirring well the whole time.
  4. Continue until the rice is al dente, firm, but not chalky when you bite into it. You want there to be some creaminess and looseness to it. There will still be liquid, but it will be thick and creamy from the starch released by the rice.
  5. Add the peas and 1/3 cup of the parmigiano reggiano and stir well. Taste for seasoning, you can add salt and pepper, but I usualy don't with this dish.
  6. Serve garnished with a bit more parmigiano reggiano.


Notes:
  • I used to use only Arborio rice for my risottos until I was turned on to the Vialone Nano and Carnaroli varieties. Just as Arborio is heads and shouders above regular long or medium-grain rices for risotto-making, so are Vialone Nano and Carnaroli far above Arborio.

    I totally recommend using Arborio when you're just starting out making risottos. Once you make the switch though, you'll notice how different the rices are. Carnaroli stays the firmest of the 3, yet it still yields the creaminess that makes a risotto a risotto. Vialone Nano seems to absorb liquid faster than the other 2.

Wednesday, May 18, 2011

French Lentil Soup

Lentil soup is one dish that manages to amaze me every single time I have it. I know, logically, that I love lentils and all, but for some reason, I am always blown away when I have the soup because somehow I've forgotten just how wonderful they really are. It's weird, I know.

My usual lentil soup has some spice to it, and is fantastic on those cold, blustery days when a little heat with your dish is what you need. The chiles and the tomato add zing and heat and this sharpness to the soup. It's intensely delicious.

This recipe, on the other hand, is pretty simple. It starts with the aromatic base of the mirepoix and then builds on the earthiness of the lentils and the flavorful herbs. Doesn't sound all that amazing, does it? But wait... The balsamic vinegar is the element that really adds the Wow!-factor to this fairly simple recipe.

French Lentil Soup


Ingredients:
  • 1/2 cup leek, white part only, minced finely
  • 1/2 cup white onion, chopped
  • 1/2 cup parsnip, peeled and chopped
  • 1/2 cup celery root, peeled, cleaned and chopped -- See Notes
  • 2 T butter (or olive oil)
  • 3/4 cup green puy lentils rinsed and picked over for stones and grit (brown lentils work really well too)
  • 1 T balsamic vinegar
  • 3 cups warm chicken broth or vegetable broth
  • bay leaf
  • 5 or 6 whole sprigs of thyme
  • 6 or 7 stalks of parsley
  • 1/4 cup celery tops (the leafy portion)
  • salt
  • pepper
  • creme fraiche (or sour cream)
  • thyme for garnish 
  • balsamic vinegar for drizzling (optional)

    Directions:
    1. Saute the leek, onion, parsnip and celery root in butter over medium-high heat until the veggies are soft and the onions have become translucent.
    2. Add the lentils and stir to coat, then add the bay leaf, warmed broth and balsamic vinegar, bring to a boil, then cover and reduce heat to low and let simmer for 20 minutes.
    3. Add the sprigs of thyme, parsley and celery tops, cover and let simmer for another half hour or until the lentils are soft.
    4. Remove the bay leaf, parsley, thyme and celery tops, taste to adjust seasoning. Now is when I add salt and pepper.
    5. With a stick blender, puree the soup until you get the consistency you like, or blend it in batches in a blender. I still like some whole lentils in my soup, but others like a smoother puree. You may have to add a bit more broth or water if it becomes too thick when you puree it.
    6. Serve topped with creme fraiche or sour cream, a bit of thyme and a teensy drizzle of balsamic vinegar.

    Notes:
    • I started this soup with a variation of a white mirepoix. Usually when I make lentil soup, I use a traditional mirepoix of 2 parts onion to 1 part carrot and 1 part celery, but I didn't want the orange and green in this soup, so I subbed parnsips for the carrot and celery root for the celery. I was in a leek mood, so I replaced half of the onion with an equal amount of leek. I imagine that this recipe would work just fine with the regular onion - carrot - celery base.
    • You can reduce or increase this recipe easily if you remember that the dry lentil to liquid ratio is 1 : 4. So, 1 cup lentils to 4 cups broth or all the way down to 1/4 cup lentils to 1 cup broth.

    Sunday, May 15, 2011

    Sausage and Pepper Roll

    Saturday night Pizza-and-Movie Nights are a common occurrence here, and the girls generally like to have their own personal pizzas so that they can each have whatever toppings they want without the bother of their sister's loathsome choices touching their own.

    So, on those nights, I generally make a huge ball of dough for their pizzas plus my own, and often have a small ball of dough left over. If I don't make a 4th pizza right then, I just stick it in the fridge and use it the next day, usually on another pizza, though occasionally I like to do something a little bit different with it. Strombolis are one of my favorite uses for extra dough, though I don't always feel like going to the deli and asking for 3 slices of capicola, 3 slices of soppressata, 3 slices of the large sandwich pepperoni, and so on.

    This is basically a version of a stromboli , though here in central NY, they tend to call it a sausage roll. Most strombolis here are certain to have pepperoni, capicola and cheese in them whereas these sausage rolls are a lot like a Gianelli's sausage and pepper sandwich, which is de rigueur for politicians to grab at the New York State Fair, but this one is all rolled up in pizza dough and baked to golden-brown deliciousness.
     
    .

    Sausage and Pepper Roll (Stromboli)


    Ingredients:

    For the dough:
    • 1 1/2 cups flour
    • 1/2 T RapidRise Yeast
    • 3/8 teaspoon salt
    • Italian seasoning (optional)
    • garlic powder(optional)
    • onion powder (optional)
    • 1/2 cup hot water (between 120-130 F)
    • 1 T olive oil
    For the filling:
    • olive oil
    • 1 sweet Italian sausage, sliced into 1/2 inch slices
    • 1 vidalia onion, chopped fine
    • 1/2 red bell pepper, chopped fine
    • 1/2 green bell pepper, chopped fine
    • 1 T minced sun-dried tomato
    • 1 T Italian seasoning
    • 1/2 cup marinara sauce
    • 1 cup shredded cheese - I used 1/2 cup mozzarella and the remaining 1/2 cup was a blend of provolone, asiago, parm and romano
    • olive oil
    • basil leaves
    • shredded parm

    Directions:

    1. Make the dough: Preheat the oven to 450. You want the kitchen to be good and warm.
    2. Put 1 cup of the flour in a large bowl along with the yeast granules, salt and Italian seasoning, garlic powder and onion powder.
    3. Mix very well with a whisk, breaking up any clumps.
    4. Test the temperature of the water (very important when you are using RapidRise yeast). When it is about 125 F, add 1 tablespoon of olive oil. Add this to the dry ingredients and mix well with a wooden spoon until all of the water is incorporated.
    5. On a well-floured surface, dump out the dough. At this point it is a wet, scary-looking, shaggy mess. Don't worry. You still have 1/2 cup of flour nearby.
    6. Knead the dough and work in the extra flour one small handful at a time. It takes a good 4-6 minutes to get the right amount of flour in. Because there is oil in it, the dough will still be slightly tacky, though not sticky. If it's sticky, keep adding flour.

      How I like to knead: I fold over half the dough and press it in, then I turn the whole ball of dough a quarter turn, and keep on folding and pressing, adding more flour to the counter and to the dough as it absorbs. You may need more or less flour depending on the humidity.
    7. Once the dough is slightly silky, shape it into a ball, re-flour a bit of the counter, set the ball on it and dust it with more loose flour then cover it with a cloth. Let it sit for at least 30 minutes, longer is better, you can even make this a day ahead and let it have a long, slow cool rise in the fridge, but this dough works well the same day too.
    8. Crumble the Italian sausage and cook in some olive oil over medium-high heat until it starts to brown.
    9. Add the onion to the sausage and saute until the onion becomes translucent. Then add the bell pepper and cook until soft. 
    10. Toss in the minced sun-dried tomato and Italian seasoning and cook until the veggies are all soft and sausage is all browned.
    11. Add the marinara sauce and stir to coat. Cook another 2 minutes, then turn off the heat.
    12. When you are ready to shape the dough, remove the cloth. It ought to have risen nicely - if it did not, chances are the kitchen is too cold or the yeast died.
    13. Punch it down.
    14. Lower the oven's heat to 400 F.
    15. Oil a pan with olive oil (or cooking spray).
    16. Place the ball of dough on a piece of parchment paper on top of a 15 x 10 in. cookie sheet and starting in the middle of the ball, flatten it gently. DO NOT PULL or STRETCH THE DOUGH That will just rip holes in it. With your fingertips, press down, gently flattening the dough until it is a large rectangle the fits your cookie sheet.. Take your time. If the dough seems stiff and unyielding, let it rest in a warm place for 5 - 10 minutes and then continue shaping.
    17. Let it sit in a warm spot and rise 10 minutes.
    18. Now to assemble: Leaving an 1 inch border around the dough, lay down a layer of 1/2 the shredded cheese. Next, add the browned Italian sausage, onion and pepper mixture. Finally, top with the remaining cheese.
    19. Very carefully, roll it the long way pretty tightly, pinching the seams.
    20. Brush the top with olive oil - I make a garlic-infused olive oil, but any olive oil is ok.
    21. Bake in a preheated 400-degree F degree oven for 12 minutes. Take out and brush the tops with a bit more olive oil and sprinkle the tops with shredded parm. Bake for an additional 5-7 minutes until golden brown.
    22. Remove to a wire rack to cool, and let sit for a good 5 minutes before slicing.
    23. Top with fresh basil and a wee bit more shredded parm if you like.
    Related Posts with Thumbnails