Monday, November 30, 2009

I Dreamed a Dream...

...of cinnamon rolls. My very-special, Christmas morning, to-die-for cinnamon rolls, to be exact.

Clearly, my subconscious is telling me something. Time to gear up for the holiday baking!

I generally only eat these rolls once a year on Christmas morning, because they are very sweet; plus sometimes, the wait is as perversely satisfying as the indulgence itself. Also, they are inextricably linked to the holidays and are laden with memory.

The smell of a batch of cinnamon rolls in the oven evokes those wonderful childhood memories of looking at the impossibly tall, sparkling tree sitting atop a ton of presents; our impatience as my sister and I did our best to wait until an appropriate hour, say 5:30 or 6 to dash into our parents' room and pull their covers off in order to get them out of bed so we could get to the cinnamon rolls and stocking gifts. It's a long-standing family tradition, sitting at the table eating fresh cinnamon rolls slathered with cold butter and tearing into our stocking gifts.

They can be labor-intensive to make if you're not really into baking with yeast dough, but they are so worth your time and effort. I have posted this recipe at another forum over the years, and have gained converts each time.

A word of warning, have a vial of insulin handy. You may also want to opt out of the icing or use a lighter hand when drizzling it on if you can't tolerate sweets.

You can make these the morning of, if you're a super-early riser; otherwise, if your Santa duties leave you begging for the chance to sleep in, you can make them the night before and let them rise overnight in the fridge.


Cinnamon Rolls

Ingredients

For the Dough:
  • 2 ½ to 2 ¾ cups All Purpose flour
  • 1/3 cup rolled oats, ground in a food processor
  • ¼ cup granulated sugar
  • 1 package dry yeast (2 ¼ teaspoons)
  • ½ t salt
  • ½ stick butter, cut into small pieces
  • ¼ cup milk
  • ¼ cup water
  • 1 egg


  • For the Filling:

  • 2 T butter, melted
  • ½ cup packed brown sugar
  • 2 t ground cinnamon
  • ½ cup golden raisins
  • ½ cup walnuts


  • For the Honey Butter Icing (my favorite):

  • 1/3 cup confectioner's sugar
  • 2 T butter, softened
  • 2 T honey


  • or

    Cream Cheese Icing (for you proles out there):

  • 1 stick butter, softened
  • 1 1/2 cups confectioner's sugar
  • 1/4 cup cream cheese
  • 1/2 teaspoon vanilla extract
  • dash of salt


Directions:

  1. In a large bowl, combine ¾ cup of flour with the ground oats, granulated sugar, yeast and salt.

  2. Heat milk, ½ stick butter and water until warm- NOT hot-about 120° F. Be sure you check the temperature with an accurate thermometer- if the liquid is too hot, it will kill the yeast, then no lovely risen dough!

  3. Make a well in the center of the dry ingredients and add the wet to dry ingredients and mix 2 minutes at medium speed with a hand mixer or a stand mixer.

  4. Add the egg and an additional ½ cup of flour; beat another 2 minutes at high speed.

  5. With a spoon, add enough remaining flour to form a soft ball of dough. Knead on lightly floured surface for 5 minutes, until smooth.

  6. Cover, let rise in a warm place until doubled, about 1 hour. Punch down the dough.

  7. On a lightly floured surface, roll the dough out to an 18x8 inch rectangle. Brush with melted butter.

  8. Take the raisins, walnuts and brown sugar and grind in a food processor about 5 seconds. Mix in a bowl with cinnamon. Then sprinkle this on top of the buttered dough, to within ½ inch of the sides.

  9. Roll up, from the long side, until you’ve got a long snake-like roll. Pinch the seams tightly and then cut into 9 equal pieces.

  10. Place, cut side up, in a greased 8x8 inch square baking pan.

    If you are making them the night before: At this point, you can place the pan in the fridge and let sit overnight. In the morning, take out the dish and let come to room temperature before proceeding with baking.

    If you are not making them in advance: Simply cover with a towel and let them rise in a warm place again, for 45 minutes

  11. Bake at 350° F for 30 minutes or until done. Let the pan cool on a wire rack.

  12. Make the icing by mixing together the ingredients in a small bowl, whisking until smooth. Then drizzle over the rolls.


Notes:
  1. Now the times I've made these and let them sit overnight in the fridge, I've never had any trouble getting them to rise by the time they go in the oven, but I found this tip from Alton Brown for getting those rolls cold from the fridge to rise a bit more. I think I'll give it a try this year and see if it makes any difference:
    Remove the rolls from the refrigerator and place in an oven that is turned off. Fill a shallow pan 2/3-full of boiling water and set on the rack below the rolls. Close the oven door and let the rolls rise until they look slightly puffy; approximately 30 minutes. Remove the rolls and the shallow pan of water from the oven.

    Preheat the oven to 350 degrees F.

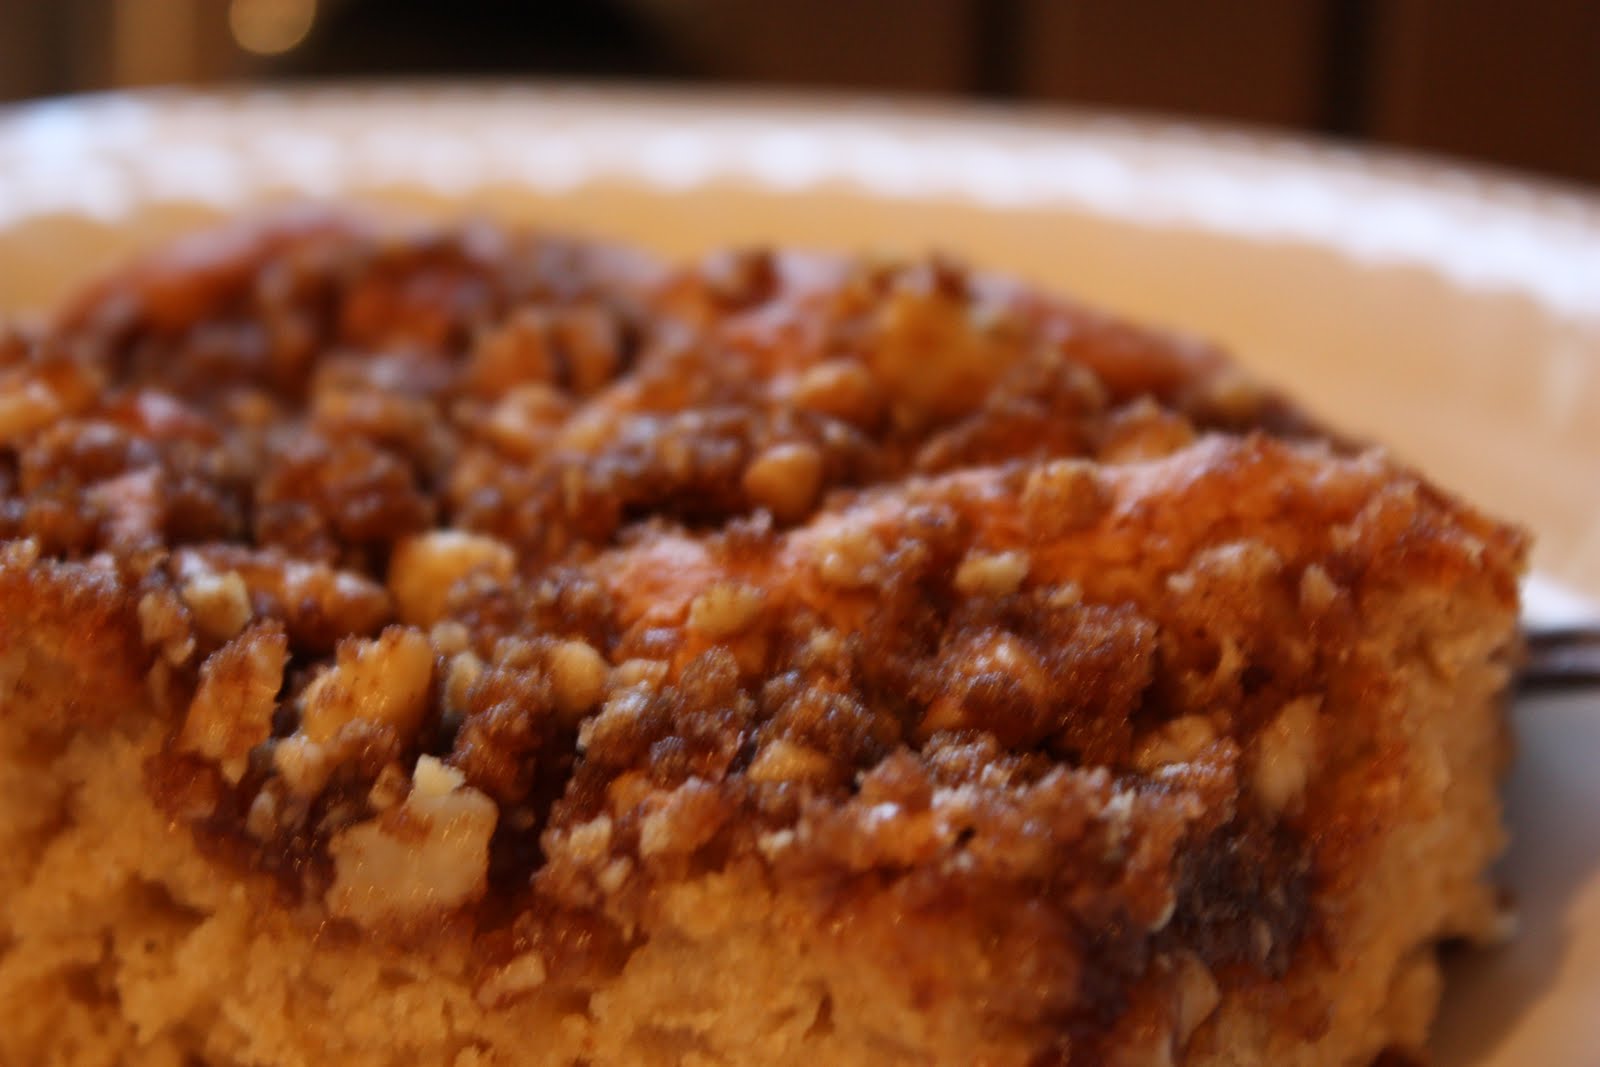
    When the oven is ready, place the rolls on the middle rack and bake until golden brown, or until the internal temperature reaches 190 degrees F on an instant-read thermometer, approximately 30 minutes.

  2. This year, I believe I may halve the recipe for the honey-butter icing. It's so lovely, but too much of it drowns the rolls.

    See? Check the picture. -->

    They are drowning in the icing. It is oh-so sinfully good, but the part of me that wants to feed us healthy food cringes.

  3. I am also giving serious thought to perhaps halving the entire recipe and seeking out a smaller pan. This pan is an 8 x 8 inch baking dish. 9 large rolls is an awful lot of wonderful sweet, cinnamony goodness for one Mommy and two girls to eat. We never eat them all on Christmas morning. I haven't tried freezing the leftovers. I think I'd rather attempt a smaller batch. Perhaps a small casserole dish might do the trick.

Tuesday, November 24, 2009

Scraping the Pantry

Ok, you know by now that I love to cook and bake - why have a food blog if I didn't? I also really enjoy grocery shopping. If I go to the super Wegman's, I can spend ages just in the produce and deli sections marveling over some of the more exotic ingredients and imagining what I'd make with them.

As much as I enjoy a fridge packed full of fresh ingredients, somewhat perversely I also look forward to the end of a really long grocery cycle; I like to see how long I can stretch things before I have to resort to a trip to the store.

My pantry is pretty well stocked, and although my fridge is small (only some 18 cubic feet), I still manage to lose items in there from time to time. For example, yesterday I found a celery root I'd forgotten about in the vegetable crisper. Still good! Raiding the pantry and the fridge and using whatever I can find to create new meals has been good practice for me when it comes to creative substitutions and figuring out what works, and what really, really doesn't work.

Does anyone else do that or do you start to freak out when you can see bare shelf space in the fridge?

I'm at that point now. I had an unexpected, not-so-cheap car repair last week that has eaten into my grocery budget. Then there's the holiday. I'll be driving 5 hours to spend Thanksgiving with the parents, so yesterday I didn't see why I should go to the store when we won't even be home for part of the week.

So, that brings me to scratch-together meals:
  • Between my fridge, freezer and pantry, I found that I had everything I need for my butternut squash soup.

  • I still have some multigrain bread from this weekend to accompany it, but it would be easy enough to bake another loaf;

  • This weekend I made my Sandra Lee type coffee cake, which didn't last long. In theory, I could make another, since I still have all the necessary ingredients.


  • For snacks, over the past few days I've finished the last straggling tablespoons of peanut butter scraped from 2 jars - spread on apples from the 1/2 bushel of Northern Spies which I'd bought at an orchard roadside stand several weeks ago.

  • I'm thinking I could do something with the leftover sausage, apples and sauerkraut, yes? My SIL gives me a quart of homemade sauerkraut every year and I think I have, um, four quarts of it still. It's great stuff, but I crave it only rarely. It should probably get eaten up though.

    How about sausage-apple-kraut piroshki? I have some wonton wrappers I could use.

  • I can probably make a curried split pea & carrot soup.

  • I could make a mushroom quiche using some of the dried mushrooms I have (porcini, morels and chanterelles), but the only cheese I have:

    • a half a block of mozzarella that I'm saving for pizza;
    • about 13 ½ string cheese sticks;
    • 2 little triangles of Laughing Cow cheese;
    • a ½-inch bit of a block parmigiano reggiano still clinging to the rind (so now it's difficult to grate without losing some skin, too);
    • ¼ pound of Cabot horseradish cheddar;
    • whipped chive cream cheese;
    • fat-free cream cheese which I picked up by accident - the Price Chopper brands of the cream cheese use blue boxes that are kind of similar, so I grabbed the wrong one by accident. I need to find a use for the fat-free stuff; perhaps I can substitute it for some of the regular cream cheese when I make a cheesecake;


    Now, I bet that horseradish cheddar might work well with the mushrooms.

  • Can you make welsh rarebit out of horseradish cheddar? I've certainly got some beer that could go into it.


See? So many possibilities. All that limits us is a lack of imagination... or spices. :)

This butternut squash soup recipe is entirely a result of my warped and unpredictable cravings. A few years ago I'd seen a recipe for a curried butternut squash and turkey sausage soup. The idea of a savory and spicy butternut squash piqued my taste buds' interest. So, after some experimentation, I came up with this recipe. I've made it for people on two occasions, and it was well-received, so it's not just my crazy taste buds that like it!

Butternut Squash Soup with Corn, Chouriço, and Jasmine Rice

Ingredients:
  • 1 cup water
  • ½ cup jasmine rice
  • 1 unpeeled butternut squash, halved and seeded
  • olive oil
  • 1 large yellow onion, chopped
  • 1 shallot, chopped
  • 1 chouriço sausage, casings removed, broken into crumbles, I use Gaspar's
  • 1 cup frozen corn
  • 2 14-ounce cans chicken broth or homemade chicken stock, warmed
  • salt to taste
  • 1 tablespoon ground black pepper, or to taste
  • ½ cup heavy cream (optional)
  • smoked Spanish paprika, (optional)

Directions:
  1. Preheat oven to 375 degrees F. Pour water into 9x13 baking dish until it's an inch high.

  2. Place the butternut squash into the prepared baking dish, cut side up.

  3. Bake in preheated oven until a fork can pierce the flesh easily, about 45 minutes.

  4. Meanwhile, place the jasmine rice and 1 cup of water into a saucepan. Bring to a boil, uncovered, over medium-high heat.

  5. Reduce heat to low, cover, and simmer until water is absorbed and rice is fluffy, about 20 minutes.

  6. Remove from the heat and fluff with a fork.

  7. Heat the olive oil in a large pot over medium-high heat. Saute the onion and shallots and cook until tender and transparent, about 5 minutes.

  8. Push the vegetables to he sides of the skillet, making a hole in the middle. Mix in the crumbled chouriço; cook until crumbly and evenly browned.

  9. Drain any excess fat. Stir in the cooked rice and corn and mix well.

  10. Scoop out cooked squash and place in a blender or bowl of a food processor. Pour 1 cup of the warmed chicken broth into the blender or bowl of a food processor with the squash. Blend until smooth, about 1 minute.

  11. Stir the pureed squash into the sausage mixture until well blended. Add more broth until you reach the consistency you like. Season with pepper, and salt to taste. If desired, stir in the heavy cream.

  12. Simmer soup over medium heat until heated through, about 15 minutes, but do not boil.

  13. To serve, I like to sprinkle a bit of smoked Spanish paprika on it.


Sunday, November 22, 2009

Multi-grain Bread

I love the idea of baking bread on Sundays.

Well, actually, I love the idea of baking bread on any day, but there's something appealing about a lazy Sunday spent in a cozy house, with enticing yeasty smells of rising bread and baking bread wafting from a warm, humid kitchen.

Seriously, I love just about everything about bread. I have a difficult time during the first few days of stage one of the South Beach diet, sometimes even dreaming about bread, its taste, hearty smell, distinct texture.

The process of making bread is an enjoyable one for me as well. Even if I take the lazy baker's way out and toss the items in the Zojirushi, and sit back and let the machine do the kneading for me, I still like to shape the dough myself and bake it in my oven, and then, as easy as you like, I have an amazing loaf of fresh, home-baked bread.

Kneading the dough myself though, has definite benefits. At times it's damned-near therapeutic, as I beat the shit out of the dough and use it as a focus for every last petty grievance, stupid annoyance and revenge fantasy. The bread is always the better for it, too.

Some breads I will always create by hand from start to finish are:
  • Whole Wheat Flatbreads, which I cook on a cast iron griddle, which really smokes the hell out of the entire house so I have to have fans running full-bore, windows wide open, and even outside doors propped open, but they're so worth it - anytime I make Indian food, I whip up a batch of these too;
  • Herbed Whole Wheat Focaccia, best served warm with a dipping sauce of balsamic vinegar and extra virgin olive oil. It tends to get eaten up very quickly;
  • Pizza dough, my super-fast, incredibly easy, no-fail recipe which can be ready to go in the oven in under 30 minutes, makes homemade pizza almost as fast as takeout, and way more satisfying. It's fun too, because the girls get to shape and top their own personal pizzas, so no more arguing about which toppings are touching each other;
  • Russian Black Bread, because sometime I crave real zakuski* - buttered black bread topped with smoked salmon, sour cream & chives or sliced pickles with a sharp horseradish cheddar - and a loaf of pumpernickel, homemade or store-bought, while tasty, doesn't have quite the same kick to it that authentic black bread has;
  • Maple Wheat Dinner Rolls, one of my favorite Thanksgiving offerings. Coming soon!

My daily-use bread is some sort of whole grain, multi-grain bread. I really like Pepperidge Farms's Natural Grains loaves and several of Arnold's Whole Grain Classics, but nothing beats a loaf of bread I've baked myself. Even my kids have come to agree. Finally. Let me tell you, that was a hard-won battle! Thank God I have never had to wean them off of Wonder bread! That stuff is like crack, and about as good for you.

One of my favorites, great as toast, the base of a grilled cheese sandwich or just by itself, spread liberally with herbed butter, is this hearty multi-grain bread.


Multi-grain Bread


Ingredients:
  • 2 ¼ tsp dry yeast
  • 1 ½ cups bread flour
  • ¾ cup whole wheat flour
  • 3/8 cup oatmeal
  • 3/8 cup multi-grain cereal, like Hodgson Mills or Bob's Red Mill
  • 4 heaping T gluten
  • 1 ½ tsp salt
  • 3 T honey or agave nectar - I've come to prefer the subtler flavor of the agave nectar
  • 1 ½ T butter
  • 1 ½ cups warm milk
  • 3/8 cup mixture of sunflower seeds and sesame seeds
Directions:
  1. If you have a bread machine, place the ingredients inside in the order the manufacturer recommends.
  2. Add the sunflower seeds and sesame seeds during the tail end of the mixing cycle (last 10 minutes) before the first rise.
  3. I prefer to use the dough cycle, so I take it out once the dough cycle has completed the first rise, punch it down, place it in a loaf pan, cover it with a towel for the second rising (about 60 minutes until it has doubled in size. If it's a cooler season, I often turn on the oven to keep the kitchen warm while the dough rises.
  4. Bake in a preheated 375° F oven for 25-35 minutes (depending on your oven - start checking it at 25 minutes), take it out to cool on a wire rack and coat the top lightly with butter if you like.
Non-machine method
  1. Place warm milk (130° F), honey and yeast in a large bowl. Let sit 5-10 minutes until yeast mixture is foamy. Add salt and bread flour, stirring to incorporate.
  2. Sift in the whole wheat flour ½ cup at a time, stirring well after each addition. Add the gluten, oats and multi-grain cereal and mix well.
  3. Add the sunflower seeds and sesame seeds.
  4. Turn out onto a lightly floured surface and knead well until the dough is smooth and elastic (appr. 10 minutes).
  5. Set in a warm place, cover with a clean dish towel and let rise 1 ½ - 2 hours until doubled in size.
  6. Punch down and knead a bit, shape and put in a greased loaf pan, set in a warm place, covered with a towel and let rise for 1 hour or until the crown is about 1 inch above the top of the pan.
  7. Bake in a preheated 375° F oven for 25 - 35 minutes. Take it out to cool on a wire rack and coat the top lightly with butter if you like.
Notes:
  • This recipe makes a 1 ½-lb loaf. I have adjusted these ingredients upwards to make 2-lb loaves as well;
  • If I make the 2-lb loaf, I usually knead it by hand because I'm not sure how large a loaf the bread machine can handle;
  • Oddly enough, the machine seems to do best with the 1 ½-lb recipe, perhaps because the pan is vertical instead of horizontal, and has two kneading paddles and a smaller recipe might not get mixed as well as a slightly larger one, though that seems paradoxical at first, it makes sense when I'm looking right at the pan;
  • Have I ever mentioned how much I love this bread machine? I get downright gushy over it at times and actively proselytize the Zojirushi whenever I can.


* For an explanation of zakuski, see this great article from Vodkaphiles.com: The Zakuska Table, and this piece from NPR Zakuski: Mighty Russian Morsels, which includes a wonderful recipe for Russian Black Bread.

Saturday, November 21, 2009

Who Wants Coffee Cake?

I am not a sweets for breakfast girl. I have never really liked cold cereal, although occasionally I'll have some granola with yogurt. The smell of sodden Cheerios has always turned my stomach, and I never relished digging down through a bowl of bobbing sugar-nuggets to get to the unnaturally-colored, cloyingly sweet dregs of milk and dissolved cereal.

When faced with a choice of pancakes, french toast, waffles or an omelette with side of hash browns and some greasy breakfast pork-item, I'll always opt for the eggs, potatoes and meat. I make pancakes and crepes for the kids because they like them. I'd rather have savory crepes with a creamy mushroom and herb filling than Natalie's preferred jam-and-yogurt.

My cinnamon buns are a once-a-year treat on Christmas morning, a well-loved tradition not to be ignored, even by me; a summertime stint working in two donut shops 20 years ago has left me with little craving for weekly donuts; but every now and then I am overcome with a craving for coffee cake.

When I mentioned to the girls (early) this morning that I was considering making a coffee cake for breakfast, Lucy had a meltdown. "Nooooooooooooo!" she wailed. "No. Coffee. Cake!!" After a bit of prodding, I realized she thought that it was a cake made from coffee. When I told her that it was just called that because it was a sweet breakfast cake that people could eat with their morning coffee, and that she wasn't obligated to drink any coffee at all in order to have some cake, she relented.

Now, I'm at the end of my usual grocery cycle, and since I'll be traveling for the holiday this week, I did a huge shopping trip recently where I restocked the pantry of several staples; I still have some items stocked away in the freezer. I am tempted to stretch it out and see what meals I can scrape together from my pantry. I love the end of a long grocery cycle - I have to be very creative about what to toss together to make a nice meal. Some of my favorite recipes have come about under those conditions!

Some friends and I were chatting about sharing our "Sandra Lee recipes" you know, those not-quite-from-scratch, shortcut recipes you may rely on but be too embarrassed to cop to using?

One of my favorites is biscuit mix sour cream coffee cake, but I happened to be right out of Bisquick. I did have a bag of New Hope Mills pancake mix, because I don't always feel like making my own batter from scratch. Sue me.

The recipe also calls for sour cream, which I rarely have on hand unless nachos are on the menu. I did have vanilla yogurt and I thought, "Why not substitute it? The yogurt is sour, like the sour cream, and the acid would probably work with the baking powder in the mix as a leavening agent. Besides which, the pancake mix was a buttermilk mix, so there ought to be some acidity already in the bag.

I opted to use brown sugar instead of white (I was out of the regular granulated sugar), substituted chopped nuts instead of flour in the streusel topping, and presto! 25 minutes later, I had a lovely, cinnamony coffee cake which both girls devoured, warm. It was the perfect accompaniment to my coffee this morning.


Cinnamon Coffee Cake

Ingredients:
  • 1 1/2 cups pancake mix
  • 1/2 cup sugar -I used brown sugar because I was out of the white
  • 1 egg
  • 3/4 cup vanilla yogurt (or sour cream)
  • 1/2 teaspoon vanilla extract

For the streusel:
  • 1/2 cup packed light brown sugar
  • 1/2 cup chopped walnuts
  • 3 tablespoons butter, melted
  • 1 1/2 teaspoons cinnamon

Directions:

  1. Preheat the oven to 350. Spray an 8-inch square baking dish with cooking spray, or grease it with shortening or butter.
  2. In a large mixing bowl, sift together the flour and sugar.
  3. Add the yogurt, egg and vanilla extract and mix well. Spread batter into a greased 8-inch square pan.
  4. Mix together the chopped nuts, brown sugar, and cinnamon in a medium-sized bowl. add the melted butter and mix well until crumbly.
  5. Sprinkle topping evenly over the top of the cake batter.
  6. Bake for 25 minutes or until a tester inserted into the center of the cake comes out clean.
  7. Let cool for 10 minutes before serving.
Notes:
  • This was tasty and fragrant, but it did not have the fine, moist, delicate crumb of some other coffee cake recipes I've tried.
  • I don't know if the brown sugar in the cake was at fault or if I should have used more yogurt or added some butter.
  • Instead of 3/4 cup, I might try 1 cup of yogurt next time.
  • Perhaps reducing the cooking time to 20 minutes would be advised.
  • All in all, still a satisfying treat. Not bad for baking on the fly.


Mmmmm.... Don't you just want to dig in?


Sunday, November 15, 2009

Whole Wheat Flatbreads

These are great, satisfying flatbreads that go well with falafel, hummus, peanut butter, curried dishes, just about anything.


Whole wheat flatbread

Ingredients:
  • 2 teaspoons dry active yeast
  • 2 1/2 cps warm water
  • 5 to 6 cups of whole wheat flour (or a combination of whole wheat and bread flour)
  • 1 T salt
  • 1 T olive oil

Directions:
  1. In a large bowl, mix together yeast and warm water. Let sit for 10 minutes in a warm place until the yeast mixture is foamy.
  2. Add 3 cups of the whole wheat flour, one cup at a time, mixing well until you have a rough, shaggy dough that starts to drag on the sides of the bowl. Cover and let rest for 30 minutes.
  3. Add the salt and oil, mix well and then add the remaining flour 1/2 cup at a time until you have a nice stiff dough.
  4. Turn out onto a floured surface and knead well for 8-10 minutes until dough is smooth and elastic.
  5. Place dough in a lightly oiled bowl, and let it rise int a warm spot for 1 1/2 hours or until doubled in size.
  6. Preheat a cast iron griddle or skillet over medium-high heat.
  7. Punch down the dough and divide in half. Section it into 8 pieces. Roll out each ball of dough to about 1/4 inch thickness.
  8. Lightly coat the griddle with cooking spray.
  9. Place a round on the griddle (mine can hold two at a time). Let it cook for 15 second, then flip it. Let it cook for about a minute until bubbles start to form, then flip it back over and let cook another minute.
    Repeat with remaining dough.
  10. Wrap the breads in a tea towel to keep warm.

Note:
This will smoke the hell out of your house, so have the windows open and the fans cranked, but it is so worth it.

Monday, November 9, 2009

Baked Eggs in Potato

I had a craving for eggs the other day. I also had some leftover mashed potatoes and a bit of heavy cream which needed to be used up lest they go over to the dark side. I recalled making baked eggs in a nest of mashed potatoes a few years ago after Thanksgiving, and I thought, "Perfect."

This makes a really lovely little breakfast, and served in individual ramekins, it presents very well. My kids really love anything served in miniature form. I'm getting a lot of mileage out of these ramekins.

Baked Eggs In Potato Recipe


Serves 3

Ingredients:
  • 1 medium potato
  • 1 T butter
  • 1/2 cup shredded cheese - more or less to taste
  • 3 eggs
  • salt and pepper
  • heavy cream

Directions:
  1. Wash and peel the potato and cut it into chunks. Place the potato in a pot of water, bring to a boil and cook until fork-tender, about 12 minutes.

  2. Drain the potato, then put in a medium-sized bowl. Mash the potato, adding butter and a little bit of cream (about 1 T) until you get the right consistency. Season with salt and pepper and add a little bit of cheese (about a 1/4 cup).

  3. Mix well.

  4. Spray 3 10-oz. ramekins (standard size) with cooking spray and dive the potato mixture between them, pushing down with the back of the spoon so that you create a well in the bottom.

  5. Next you can simply crack one egg into each well and top with cheese or you may beat each egg with a bit of cream and add the cheese to the beaten mixture, then pour it into the ramekins. My kids prefer the texture of the egg when it's beaten, although I like the traditional baked eggs.

  6. Place the ramekins in a pan or on a cookie sheet and bake in a preheated 400 degree oven for about 25 minutes or until the eggs are set.

  7. BEWARE: If you beat the eggs, cream and cheese instead of just plopping in a whole egg, the mixture will puff up when it cooks. This is why setting the ramekins in a pan or on a sheet helps.


Thursday, November 5, 2009

Spinach Risotto

A carb-addict, I tend to go for the starchy foods. In my pantry - which, in my galley kitchen really just amounts to my cabinets and countertops - I have a variety of different rices:
  • Regular old long-grain white rice which I buy in 10-lb bags and use in mixed-grain pilafs;
  • Long-grain brown rice;
  • White basmati rice, when I want Indian food;
  • Organic brown basmati rice, when I want to be virtuously healthy about craving Indian food;
  • Jasmine rice, its delicate fragrance essential for when I crave Thai food or want to make my butternut squash soup with chouriço and corn;
  • Sticky rice, or Glutinous rice from my local Korean grocer, which I use only when I make kimchi-fried rice. You may wonder, how often can a person actually make and eat kimchi-fried rice? Well, you'd be surprised. Living in Korea for a year has left me with a permanent craving for Korean foods which will strike at odd times.
  • Wild rice, not a real rice, but a reedy grass, native to North America. Still, when mixed with an assortment of mushrooms, it makes a wonderful stuffing for a leg of lamb.

  • and finally:

  • Arborio rice, for my rice porridge and risotto fixes.

I had my first bite of risotto at a friend's house. Until then, I'd had no idea what I was missing. I was fortunate in that I was present when she was making this, so I have since done my best to deconstruct the recipe and have made it many times, with great success.

In fact, this is the only way I have gotten my kids to eat cooked spinach when it's all out there in the open as a major ingredient; all the other times I've had to skulk around the kitchen furtively and hide the spinach in lasagna, stuffed shells or that one time when I made homemade ravioli.

Poor spinach! Such a maligned food, yet so good for us! This filling and warming recipe is a good bet to get some of your pickier eaters gobbling down the green stuff.


Spinach Risotto with Toasted Pine Nuts

Ingredients:
  • 6 cups broth (chicken, vegetable), heated
  • 2 T olive oil
  • 2 T butter
  • 2 shallots, finely minced
  • 1 medium onion, chopped
  • ½ cup dry white wine
  • 2 cloves garlic, minced
  • 1 10-pkg frozen, chopped spinach, thawed
  • 2 cups Arborio rice
  • ½ cup freshly grated parmesan cheese
  • ¼ cup pine nuts, toasted*


Directions:
  1. Bring the broth to a boil and the reduce heat to low.

  2. In a deep saucepan, melt the butter and olive oil over med-high heat. Saute the shallots, onion and garlic until soft and translucent, not browned.

  3. Add the rice and stir, coating all the grains.

  4. Add the spinach and stir well, breaking up any clumps. Let any excess liquid from the spinach absorb fully.

  5. Reduce heat to medium, stir in the wine; once it is absorbed, add the hot broth, one ladleful at a time, waiting until the liquid is absorbed before adding more.

  6. After 15 minutes, taste some of the rice. It should be firm, not mushy, but it should not be bright white in the center and chalky. You will probably have some broth left over.

  7. Take off the heat and stir in the parmesan and top with toasted pine nuts.

  8. Serve, garnished with additional grated cheese if you like.


* To toast the pine nuts, I like to do it in an un-greased skillet over high heat, stirring constantly, because once they start to burn, they go really fast! At the first sight of light browning, take them off the heat and put them into a bowl.

You can also toast them in the oven on an un-greased cookie sheet at a low setting, but you'll have to check them frequently.
Related Posts with Thumbnails