Monday, November 14, 2011

Making Beef Stock

I first made beef stock last winter and was amazed by the difference between homemade stock and stock from a cube or a granule. There is no doubt that this is a time-intensive endeavor requiring maintenance as you skim the impurities from the surface of the stock, but I think that it is worth the time and effort.

I was inspired by this video and make stock basically the same way, with a few of my own changes.


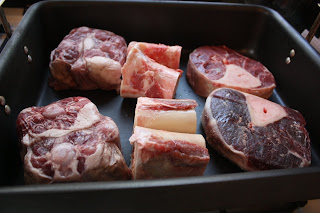
I started with 8 lb. of bones and meat: 4 lb. of oxtails on the left, 2 lb. of beef marrow bones in the middle, and 2 lb. of beef shanks on the right.

Preheat in the oven to 450 F.


Cover the bones with 12 oz. of tomato paste.


Add 2 large carrots on top of the beef and then roast for an hour.


Meanwhile, grab your largest stock pot. I use my monster 20-quart pot for beef stock.


Heat some olive oil and sweat down onions, leeks, carrots and celery. I used 2 large onion, chopped roughly, about 2 cups of leeks, both the white and the green parts, 2 more large carrots, roughly chopped, and a large bunch of celery, chopped.

Cook until it starts to soften.


Then add 2 bay leaves, a large amount of parsley, fresh thyme and 2 large roma tomatoes, quartered.


See the lovely roasted bones?


Take the roasted bones, carrots and tomato paste and add it all to the stock pot.


Deglaze the roasting pan with some white wine and a bit of water and and scrape up all of the lovely fond at the bottom and then add it to the stock pot as well.


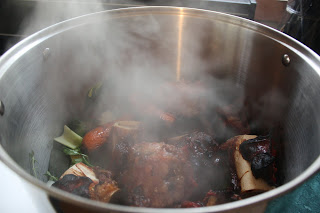
Add enough cold water to cover the everything in the pot and bring up to between 180 and 200 F, and let simmer uncovered for 8 - 12 hours.


As the stock simmers, skim off any fat, scum and impurities.


In about 10 hours, the stock will be finished, at which point I'll strain it and cool it in an ice bath and then freeze in ice cube trays. Stay tuned...

Sunday, November 6, 2011

Crab Tartlets

We love finger foods here. I am always on the hunt for new appetizers to serve at the various family functions. Puff pastry is always a good place to start. You can create strudels out of it, layer it with ingredients and fold it over, cut it into rounds and place them in muffin tins, it provides a near infinite variety of snacks and dishes.

The family also goes nutso over seafood, particularly crab, so any opportunity to fold together something crabby with something creamy is always welcome in this house.


Crab Tartlets


Makes 12 tartlets


Ingredients:
  • 1 sheet puff pastry, thawed and cut into rounds with a 3 inch biscuit cutter
  • ½ cup lump crab meat, roughly chopped
  • 2 tablespoons of mayo
  • 2 tablespoons garlic and herb Boursin cheese
  • ½ teaspoon sriracha more or less to taste 
  • 1 teaspoon whole grain mustard
  • 1½ teaspoons minced shallot
  • 1½ teaspoons minced celery
  • ¼ cup shredded cheese - I used a mixture of extra-sharp cheddar, parm and romano
  • Old Bay to taste
  • ¼ cup soft, unseasoned bread crumbs

Directions:
  1. Preheat the oven to 375° F.
  2. Place the rounds of puff pastry into the bottom of a 12-well muffin pan.*
  3. Mix together the crab, mayo, sriracha, mustard and Boursin in a bowl, then add the minced shallot and celery and the shredded cheese. Stir well to combine.
  4. Taste and then season with salt, pepper and Old Bay to suit your taste.
  5. Add the bread crumbs and toss to combine well.
  6. Put a heaping teaspoon on top of each pastry round in the muffin pans and then bake for 15 - 20 minutes or until the pastry starts to get golden brown. 
  7. Carefully pry the tartlets from the muffin pan and let cool on a wire rack and then serve.
Notes:
  • I put the pastry rounds into an ungreased muffin pan and then stuck like hell, but for some reason, with this particular muffin pan, that is always the case. Next time I might try greasing it liberally with Crisco or even resorting to muffin liner papers or using my new silicone muffin cups.
  • Any leftover crab mixture makes a wonderful crab cake mixture with the addition of a bit more soft bread crumbs. The resulting texture is soft and somewhat bready, like what you get with baked stuffed clams. It was an unexpected delight.


Saturday, November 5, 2011

Butternut Squash Risotto with Caramelized Onions and Crispy Sage Leaves

Risotto is one of my little indulgences. The kids have only recently decided that they like rice, and they are still very particular about which rice dishes they find acceptable. My quinoa and rice pilaf is at the very top of their list, but risotto is my favorite.

Risotto is more of a technique than a dish, and it is open to an almost infinite variety of combinations. The first risotto I ever had was a spinach risotto with toasted pine nuts, and my standard is a wild mushroom risotto with pancetta and thyme.

I came across this recipe from Williams Sonoma and knew that had to make a variation of it. I love the combination of butternut squash and sage, and I thought that the addition of the sweet, sticky caramelized onions would be a lovely addition to the creaminess of the risotto.

It was.


Butternut Squash Risotto with Caramelized Onions and Crispy Sage Leaves


Makes 1 serving


Ingredients:
  • 1 medium onion, sliced thinly
  •  4 tablespoons of butter
  • olive oil
  • 3 tablespoons minced shallot
  • ¼ cup Carnarole rice or another suitable risotto rice like Arborio or Vialone Nano
  • ¼ cup sherry or white wine
  • 1 quart warm stock
  • ¼ cup roasted butternut squash, cubed
  • ¼ cup roasted butternut squash, pureed
  • salt
  • pepper
  • ½ cup freshly grated parmesan
  • whole fresh sage leaves

Directions:

  1.  Make the caramelized onions by cooking down the thinly sliced onion in 2 tablespoons of butter over low heat for an hour or until the are richly browned and sticky. Stir frequently to be sure that they don't stick and burn. Set aside.
  2. Make the crispy sage leaves by melting 1 tablespoon of butter and sauteing the leaves until crispy. Set aside.
  3. Melt 1 tablespoon of olive oil and 1 tablespoon of butter in a large skillet and saute the shallot until soft, then add the rice, stirring until everything is nicely coated. Cook for 2 minutes.
  4. Pour in the sherry or wine and cook, stirring frequently, until all of the liquid has been absorbed.
  5. Start adding the warm stock 1 ladleful at a time, stirring frequently, and continue to cook until the rice is done al dente - it will still have some bite to it, but not be chalky or crunchy. The grains of rice should have lost the white opaque center. This could take 10 minutes or up to 20 minutes depending on hte type of rice. Taste as you go.
  6. Add your salt and pepper and stir in the caramelized onions and grated parm. Stir well.
  7. Serve topped with crispy sage leaves.

Notes:

  • I made a few changes from the original recipe because I wanted both pureed squash and cubes of squash for a little textural contrast, and I used sherry instead of white wine because that's what I had on hand.

Friday, November 4, 2011

Pumpkin Bread

Look! More pumpkin!

Yes, we've been hot-and-heavy with the winter squashes lately, but that's ok, because they are equally delicious in sweet and savory dishes alike. Some people think that pumpkin's only reason for existence is to be carved into some gruesome jack o'lantern for Hallowe'en or magically whipped up into a pie for Thanksgiving, but it is so much more versatile than that.

Truth be told, pumpkin pie isn't even my favorite pumpkin dessert. No, that would be spiced pumpkin cheesecake. Coming in after that, and still before the pie, are pumpkin gingerbread and pumpkin bread, and those are still in the realm of desserts. Dishes such as pumpkin lasagna, pumpkin ravioli in sage brown butter and curried pumpkin soup do a fantastic job of showcasing pumpkin's savory side.

If you want something pumpkiny and immediate, a quick bread like this one really delivers. It took me longer to assemble my ingredients than it did to get the batter in the oven, and the scent that filled the house while it was baking was just indescribably wonderful. Those fall baking smells are one of the reasons I look forward to fall so intensely.

This loaf is richly scented and moist, with the bits of pecan studded here and there providing nice texture.

Pumpkin Bread


Ingredients:
  • 1 cup fresh pumpkin puree, or about ½ of a 15 oz. can
  • 2 eggs
  • ½ cup pumpkin-apple butter*
  • 1/3 cup water
  • 1 cup brown sugar
  • 1¾ cup all-purpose flour
  • 1 teaspoon baking soda
  • ¾ teaspoon salt
  • 1 teaspoon cinnamon** 
  • ½ teaspoon nutmeg
  • ¼ teaspoon cloves
  • ¼ teaspoon ground ginger
  • ½ cup chopped pecans
Directions:
  1. Preheat the oven to 350° F
  2. Grease and flour a large loaf pan.
  3. Ina  large bowl, mix together the pumpkin puree, eggs, pumpkin-apple butter and water until thoroughly combined. I did this in the food processor when I realized that the pumpkin puree I had processed the other day still had some chunks of pumpkin in it.
  4. In another bowl, mix together the flour, baking soda, salt and spices.
  5. Add the dry ingredients to the wet, and mix well.
  6. Stir in the pecans.
  7. Scrape the batter into the prepared loaf pan and bake for 50 - 60 minutes or until a toothpick or cake tester comes out clean.
  8. Cool in the pan for 5 minutes and then turn out onto a wire rack and let cool.

Notes:
  • I replaced the oil that is usually found in these recipes with pumpkin-apple butter, but if you don't have any, you can substitute with the same amount of applesauce or a mild oil, like canola.

    If you do use the same pumpkin-apple butter, you can cut down on the spices provided in the recipe, because the pumpkin-apple butter is very generously spiced already. In fact, I added no extra spices at all. If you decide to use oil or applesauce, however, you will need to add the spices listed in the recipe.

Thursday, November 3, 2011

Butternut Squash and Crab Bisque

I had this recipe in mind when I first got my hands on a butternut squash at the farmers' market back in September. I went so far as to make my own shellfish stock by simmering crab shells and leftover shrimp tails with white wine, onions, celery and carrots and a hit of tomato paste. The house smelled like a crab house down by a Maryland pier, and the cat was going out of his mind, taunted by the smells of seafood.

As it turned out, by the time the stock had finished simmering and I had cleared out the detritus of stock-making, I lost my will to live and felt no urgency to clean, roast and then puree the squash, so I ended up freezing the stock for "some other time."

Well, that time came, and was it ever worth it!


Butternut Squash and Crab Bisque


Ingredients:
  • olive oil
  • 1 medium onion and 1 small shallot, chopped - about 1 cup, total
  • 1/2 cup chopped carrot - I also tossed in some leftover parsnip
  • 1/2 cup chopped celery
  • 2 cups butternut squash - I used already roasted cubes and puree
  • 2 - 3 quarts of stock, simmering - I used homemade shellfish stock, but chicken or vegetable  will work nicely too*
  • Old Bay
  • salt
  • pepper
  • crab meat
  • cracker crumbs (optional)
  • heavy cream (optional)
  • sherry (optional)

Directions:
  1. Saute the chopped onion and shallot in olive oil over medium heat until softened, then add the carrots, parsnip (if using) and celery and cook until the vegetables are soft.
  2. Add the butternut squash and 2 cups of the warmed stock and bring to a boil, then add another 2 cups of stock and simmer, covered until the squash is fully cooked, adding more stock as needed.
  3. Puree the soup with a stick blender or in batches in a blender, adding more warm stock as needed to reach the consistency you like.
  4. Season with salt, pepper and Old Bay. You can be generous with the Old Bay. This soup can accept a lot of seasoning. 
  5. Ladle into bowls, hit with a shot of cream and/or sherry and top with lump crab meat and cracker crumbs and another dusting of Old Bay.

Notes:

  • When I make pureed soups like these, I generally keep a large pot of stock simmering on the back burner. I can never say with certainty how much stock goes into these soups, but I'd rather err on the side of having too much stock at hand than not enough. Any remaining stock gets refrigerated or frozen in ice trays for other uses, so stock never has to go down the drain.


Wednesday, November 2, 2011

Chicken Fricassee

Chicken fricassee is, as you might guess, a French dish. I've heard it described as French comfort food, and why not? Basically you take some chicken and simmer it to wonderful succulence in a thickened sauce with aromatic vegetables and then, the pièce de résistance, go that extra mile and cook down that sauce to a rich, cream-bolstered gravy. How can anyone go wrong with that?

Here in central NY, I've heard this dish called, fondly, "Chick Frick," or even "Frickin Chicken," and everyone seems to have pretty strong opinions of what is or is not Chick Frick. Kopp's Canteen in Chittenango was known for its chicken fricassee and had a loyal following who were pretty bummed when the restaurant closed a few years ago. Not too long ago, there was even a piece in the local paper announcing that another restaurant had the original Kopp's Canteen recipe for chicken fricassee. Big news. Seriously.

The thing is, this is not a difficult dish. I was fortunate enough to have the Chick Frick at Kopp's before they closed, and the fans are right - it was really good. I don't claim to have Kopp's original recipe, but I will say that this one I make is pretty damned tasty. It is tasty enough to get my kids to devour 2 full servings of it, and let me tell you, that's pretty good.

Aside from how delicious and satisfying this meal is, one of the things I like the most about this dish is how it fills the house with a wonderfully inviting smell that lingers... in a good way. Now, I love fish, and it smells divine while it's cooking, but that smell is not one that improves with time. Hours after a seafood meal, the kitchen does not smell especially inviting, and I'm usually rubbing everything down with lemon juice and spritzing the joint with Lysol to fight back the odor of once-cooked fish. Hours after a chicken dinner has been cooked and devoured, the kitchen still has that cozy comfort-food scent to it.

Feed the body with nourishing food, feed the soul with coziness. It works for me.


Chicken Fricassee


Serves 2 hungry kids 

Ingredients:
  • 4 chicken drumsticks, rinsed and patted dry
  • ½ cup flour
  • 1 teaspoon sweet Hungarian paprika
  • ¼ teaspoon black pepper
  • ½ teaspoon granulated garlic or garlic powder
  • butter
  • ½ cup chopped onion
  • ¼ cup diced parsnip
  • ½ cup chopped mushrooms - I used royal trumpet mushrooms, but any of your favorite mushrooms would be nice
  • a good glug of sherry, 1 - 2 tablespoons
  • 1½ - 2 cups warmed chicken broth
  • sprigs of fresh thyme 
  • 2 small bay leaves or 1 large bay leaf
  • salt
  • pepper
  • heavy cream
Directions:
  1. Place the flour, paprika, black pepper and granulated garlic (or garlic powder) in a large ziplock bag and shake gently to mix. Add the drumsticks to the bag, seal and shake to coat the chicken with the flour mixture thoroughly. Remove the flour-coated chicken to a plate to rest and reserve the flour and spice mixture in a bowl and set aside.
  2. In a dutch oven or a large, deep skillet, melt 1 tablespoon of butter over medium-high heat and brown the chicken until all sides are nicely golden. Remove the chicken to a plate and let rest.
  3. If the chicken released a lot of fat, you might want to drain off some of that grease, otherwise leave it there and add to the sizzling fat + butter combination, adding more butter if needed, your chopped onions and let cook until softened. Then add the parsnips and cook for 2 minutes before adding the chopped mushroom. 
  4. Cook for another 2 - 3 minutes or until the veggies are soft, then add 1 cup of your warmed chicken broth and a few glugs of sherry.
  5.  Stir in the reserved flour and spice mixture that you used to coat the chicken, stirring well to make sure that the flour is incorporated and the sauce is not lumpy.
  6. Add the sprigs of fresh thyme and bay leaves and bring to a boil. Place the chicken back into the pot and pour in the remaining ½ - 1 cup of broth, cover and reduce the heat to low and let simmer until the chicken is thoroughly cooked, with an internal temperature of 165° F, about 45 minutes to an hour.
  7. Once the chicken has cooked through, remove it to a plate and cover loosely with foil to keep warm, and work on the sauce. Skim off any pools of grease floating on the top. Fish out and discard the bay leaves and thyme sprigs, raise the heat to medium-high and let the sauce cook down, stirring frequently to make certain that it does not scorch. 
  8. Once it has thickened to your liking, maybe after 10 minutes, maybe after 20, it's up to you, add a shot of heavy cream and stir. I start with about 1 tablespoon and go from there. If you like, you can finish the sauce with a squeeze of lemon juice or a tiny splash of sherry vinegar to add a little acidic bite, but my kids prefer it without.
  9. Taste to check for seasoning and add salt or pepper as you feel necessary and serve with your chicken over biscuits, noodles or rice.
Notes:
  • These 4 drumsticks were enough to feed my 2 kids. Obviously, if you are cooking for a crowd, you'll want to make way more. 
  • Instead of parsnips, you could use some carrot. I have grown fond of onion-parsnip-mushroom combination, but do what works for you.

Tuesday, November 1, 2011

Maple-Walnut Butter Tart

I am a huge fan of maple, particularly with walnut. Maple-walnut ice cream is one of my all-time favorites, and a few years ago, I made mini maple-walnut apple crisps, which my kids devoured pretty quickly. Even though I live in a maple-producing state, and real, good-quality maple syrup is abundant and relatively easy to find in any grocery store, you'd be surprised find that, short of visiting a maple sugar house, it is very difficult to find granulated maple sugar or maple butter.

This summer at the downtown farmer's market, I found a vendor there one day with locally produced granulated maple sugar and maple butter, and I quickly snagged the largest jar of the sugar that they had, knowing that I could find at least 101 uses for it.

This is my maple-walnutty version of the classic Canadian sweet, the butter tart. It's similar to English treacle tarts, or Southern pecan pie, and not dissimilar to the molasses-based  Shoofly pie of the Amish - it basically seems to be a buttery crust filled with a sugar-intense, gooey filling. Everything else is optional, except for the sighs of delight, and maybe the wish for a vial of insulin.


Maple-Walnut Butter Tart


Ingredients:

For the press-in butter crust
  • 1 cup all purpose flour
  • 2 tablespoons sugar
  • 6 tablespoons butter
  • 1 egg yolk
For the filling:
  • 1/4 cup maple syrup
  • 2 tablespoons packed granulated maple sugar
  • 2 tablespoons packed dark brown sugar
  • 2 tablespoons butter, melted and then cooled
  • 1 egg
  • pinch of salt
  • 1/4 teaspoon vanilla
  • golden raisins
  • chopped walnuts, almost to the point of being pulverized
  • granulated maple sugar
Directions:
  1. Make the crust by mixing together the flour and sugar and rub in the butter until the mixture resembles coarse crumbs. 
  2. Add the egg yolk and mix well, pressing it into a ball. 
  3. Rip off a portion of the dough and press it into your tart pan. Repeat with more dough - you will likely have some of this dough left over. Wrap it in plastic wrap and keep it for another use. 
  4. Lay down a small piece of parchment in the tart shells and add some baking weights or dried beans and and blind bake them at 300 degrees Fahrenheit for 12 minutes. 
  5. Remove and let cool.
  6. Raise the oven temp  to 400 degrees F. 
  7. Mix together the maple syrup, 2 T of brown sugar and 2 T of maple sugar. 
  8. Add the melted butter and stir to combine well. 
  9. Add the egg, stir. Add the salt and vanilla and mix until it is nicely smooth.
  10. Place a few golden raisins and some of the chopped walnut in the bottom of the tart shells. 
  11. Sprinkle some granulated maple sugar over it and pour in the sugar mixture. 
  12. Top with a bit more of the chopped walnut and sprinkle some granulated maple sugar on top and bake for 15 - 20 minutes or until just set.


Related Posts with Thumbnails