Wednesday, April 20, 2016

Thai Beef Tenderloin Salad


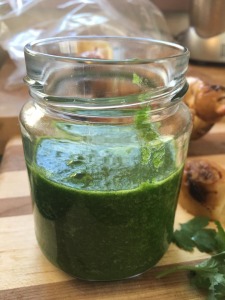
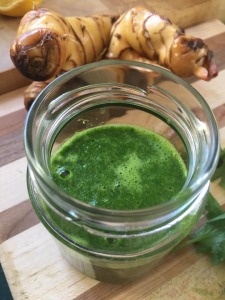
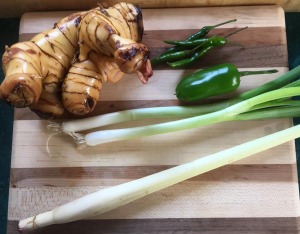
 I went to Wegmans yesterday to stock back up on some items. I really enjoyed my Zoodles last week, so I got more zucchini and some yellow summer squash for more veggie noodles. As I cruised through the exotic produce section, I found some galangal and stalks of fresh lemongrass. Immediately, I thought of Thai green curry. I ran back to the hot pepper section and found some small green Thai bird chilies. Thai Green Curry paste? It's so on!


galangal et al
 
thai green curry paste 2 thai green curry paste
I will be using this paste in Thai Green Curry Chicken this week accompanied by coconut cauliflower rice.

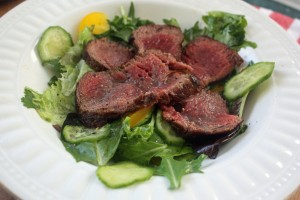
But I still had one small tenderloin leftover from when I made the Beef and Broccoli Stir Fry the other night, so with thoughts of Thai food still lingering in my head, I though what better use for it than a beef tenderloin salad?
 

Thai Beef Tenderloin Salad

Thai Tenderloin salad

Ingredients

  • 6 oz beef tenderloin
  • olive oil
  • butter
  • spring salad mix
  • thinly sliced cucumber
  • thinly sliced yellow bell pepper
  • sliced green onion
  • fresh cilantro
  • fresh mint
For the dressing:
  • 3 T fish sauce
  • juice of 2 limes
  • 1 teaspoon sugar (or equivalent sweetener - I used a packet of stevia)
  • thin slice of fresh ginger, smashed (regular ginger, not galangal)
  • pinch of black pepper
  • pinch of ground red pepper

Directions:

  1. Mix together the ingredients for the dressing in a bowl, whisking well, and set aside.
  2. Mix together the vegetables for the salad and toss in the dressing, mixing well.
  3. Put 1 T olive oil in a cast iron skillet, and place it over medium-high heat and get it sizzling hot. Sear the tenderloin on all sides and cook on 5 minutes per side. Let rest on a cutting board for 5 minutes, then slice into strips and serve with the salad.

Sunday, April 17, 2016

Beef and Broccoli Stir Fry

Eating keto does not have to mean death to Chinese food. I've used cauliflower rice as a nice substitute for rice, and either zucchini noodles or shiritaki noodles can be a great alternative to wheat-based noodles.

That said, I've found that it really is not necessary to serve this over anything. I'm satisfied with a bowl of this beef and broccoli stir fry just on its own.

Beef and Broccoli Stir Fry

Ingredients:

  • peanut oil or canola oil
  • 8 oz beef tenderloin, cut into strips
  • 2 tablespoons soy sauce
  • 1 teaspoon granulated garlic
  • 2 cloves garlic, minced
  • 1/2 teaspoon fresh ginger, minced
  • 2 cups fresh broccoli florets
  • 2 cups chopped baby bok choy
  • 2 green onions, sliced
  • 1 teaspoon toasted sesame oil
For the stir fry sauce:
  • 4 tablespoons soy sauce
  • 1 tsp xanthan gum*
  • 1/4 tsp ground ginger
  • pinch red pepper flakes
  • splash of chili oil
  • 2 teaspoons rice vinegar
  • 1-1/2 cups beef broth
To serve:
  • Cauliflower rice – to serve*
  • green onion tops sliced – garnish
  • sesame seeds – garnish

Directions:

  1. Preheat oven to 400F.
  2. Cut cleaned broccoli into small florets. Toss with olive oil, salt and pepper and roast for 20 minutes, stirring halfway. Remove from oven and set aside.
  3. Cut beef with the grain into 1 1/2 inch strips. In a bowl, mix the beef strips with soy  sauce and granulated garlic and let marinate for 15 minutes.
  4. Prepare the stir fry sauce by mixing together the sauce ingredients listed above, whisking together well.
  5. Heat your wok over medium high heat on stove with a tablespoon of peanut oil. When the oil begins to shimmer, add half of the marinated beef strips and cook until meat is browned, about 2-3 minutes. Remove from pan and set aside. Add another tablespoon of oil and repeat cooking the rest of the meat.
  6. Clean the pan of excess oil and beef residue – I wad up a paper towel and grasping it with tongs, give a quick swipe of the bottom of the pan.
  7. Add some more oil to the pan, once it is hot, add the minced garlic and ginger and cook for one minute then add the sliced bok choy. Cook for 2 minutes.
  8. Add the stir fry sauce, cook over medium high heat and the add the meat. Cook until sauce boils and then thickens. Toss in the roasted broccoli, stir until everything is nicely coated, and serve over cauliflower rice, garnish with sliced green onion tops and sesame seeds.


Notes:

  •  If you are not low-carbing it, you can use the more traditional cornstarch as a thickener;
  • Likewise, you may serve this over rice, or with buckwheat noodles instead of the low-carb substitute, cauliflower rice.

Wednesday, April 13, 2016

Spaghetti Squash Aglio e Olio

Some people are bona fide Chocoholics, others are Cuckoo for Cocoa Puffs. I don't have much of a sweet tooth, vatsly preferring starchy, yummy, carby delights, such as pasta. If I had to pick just one pasta dish to stay with me on a desert island, it'd be Spaghetti Aglio e Olio (garlic and olive oil).

Back when I was hard-core carb-loading, I even finagled a recipe which took 20 minutes total from dry spaghetti to finished garlicky aglio e olio wonderfulness. It just takes a skillet large enough to hold  dry spaghetti. It’s really an amazing way to cook it. No more waiting 30 minutes for your huge pasta pot of water to boil.

But I digress. I've enjoyed finding substitutes for pasta. So far, I quite enjoy zucchini noodles and the stand-by, couldn't be simpler to prepare, spaghetti squash, which really works well in this recipe.


Spaghetti Squash Aglio e Olio

Ingredients:

  • 1 spaghetti squash
  • 1 T butter
  • 2 T olive oil
  • 2 large cloves garlic, minced
  • granulated garlic
  • red pepper flakes
  • grated parm from a can
  • fresh shredded parm or romano
  • salt
  • pepper
  • fresh basil
  • Fresh chopped parsley

Directions:

  1. Prepare the spaghetti squash:
    • Preheat oven to 400 F
    • Cut squash in half and scoop out the seeds and stringy fibers.
    • Place cut side down in a roasting pan and add 1 inch of water.
    • Bake uncovered for 45 min to an hour until the flesh separates easily into strands when pulled with a fork.
  2. Heat butter and olive oil over medium heat.
  3. Add the minced garlic and cook until the garlic becomes fragrant, but not browned.
  4. Add red pepper flakes, granulated garlic, stirring to incorporate.
  5. Toss in the cooked spaghetti squash, stir to coat, turn up the heat, sprinkle some grated parm over, season with salt and pepper, stir through.
  6. Serve, topped with fresh shredded cheese, fresh basil and chopped parsley.

Notes:

  • You can easily add in some leftover cooked chicken for some protein.
  • And how about some cubes of mozzarella and halved cherry tomatoes? They all work nicely.

Monday, April 11, 2016

Utica Greens

Eating low-carb can most easily and effecively be done by eating nothing but just meat, cheese, and eggs, supported by vegetables. It's quite satisfying, as the proportionately  heavy fat and protein consumption really increases satiety. I can't really overeat if I'm cosuming meat nad cheese, or at any rate, I cannot overeat by volume as much as with carbs. It's far easier to sit and plow through a family size bag of potato chips than binge on a carton of a dozen eggs.

 On occasion, we still crave those traditionally carb-based meals. With the rising popularity of the low-carb lifestyle, the food industry has attempted to come up with lower-carb or lower-GI foods, such as Dreamfield's pasta, Atkins  and South Beach brands of snacks and meals, and many, many more. Many of these items are processed convenience foods, just reformulated to be somewhat lower in GI-spiking carbohydrates.

As in most things, I think it's best to stick with foods that are closest to their natural form, or put another way, foods that are still recognizable as food. Add to that a little fun kitchen ingenuity, and we come up with avocado fries as a substitute for french fries, mashed cauliflower for mashed potatoes, and even pulverized pork rinds for bread crumbs, which plays to nice effect in the recipe linked below.

Want more? OK! Everyone's favorite comfort food, mac-n-cheese becomes cauliflower mac and cheese, fettuccine Alfredo is now spaghetti squash Alfredo,  and let's not forget pizza, well, just as with the real item (have you seen John Stewart’s clips on NY vs. Chicago pizza?!) there are many variations, from cauliflower crust pizza, to a crust with almond flour and cheese or psyllium husks, to one of my favorites, low-pepperoni pizza cups.

I’ve gotten pretty adept at adapting  recipes to make them keto-compliant – I love to cook, and I do enjoy a challenge. We had a catered lunch recently with some local favorites: Chicken riggies and Utica greens. To be honest, I've never had chicken riggies which were anything more spectacular than just some chicken, pasta and sauce, but the greens? Utica greens are amazing.

Seeing people dive into the pan of greens whetted my taste for them, and I thought that the bread crumbs could pretty easily be subbed out for a mixture of pork rinds, parm and parsley.

I was right. These were fabulous!

Utica Greens


Ingredients:

  • 2 heads of escarole
  • Olive oil
  • 3 slices prosciutto
  • 5 slices pancetta – prob about ¼ cup chopped pancetta
  • 1 onion, chopped
  • 3 large cloves garlic, chopped
  • Pickled hot peppers, chopped – prob about ¼ cup
  • Red pepper flakes
  • granulated garlic
  • ½ cup chicken stock
  • Salt and pepper
  • Parm and/or romano – shredded and grated, probably about ½ cup
  • ½ cup pulverized pork rinds with minced parsley - You can use an equivalent amount of seasoned soft bread crumbs if  you are not low-carbing
  • handful of fresh parsley, minced
  • More cheese for garnish

Directions:

  1. Preheat oven to 400 F.
  2. Bring a large pot of salted water to boil.
  3. Mix together the shredded and grated cheeses, minced parsley, and the pork rind mixture and set aside in a bowl.
  4. While the water is coming to a boil, chop the rough end off the heads of the escarole and let them soak in a large bowl of cold water to get rid of any dirt or grit. Take them out, squeeze out the water and roughly chop the two heads into strips.
  5. Once the water has come to a boil, drop the chopped escarole into the water. Let cook for 7 minutes, then drain and shock the greens into an ice water bath. Once cool, squeeze out as much excess water as you can. Set aside.
  6. In a large skillet, heat some olive oil over medium heat. Brown the meats, starting with the pancetta. Once it is starting to brown up, add the chopped prosciutto. When they start to crisp up, add the chopped onion.
  7. When the onion is translucent and soft, add the chopped hot peppers, let cook for a few minutes, then add the garlic, red pepper flakes and granulated garlic.
  8. Once the vegetables are cooked through, add the chopped escarole, breaking up any clumps. Stir and cook until the greens are heated through. Season with salt and pepper. Add the chicken stock and cook for 5 minutes.
  9. Spread the greens into an 8 in x 8 in baking dish and top with the bread crumb and cheese mixture, Bake for 15 minutes or until the topping is nicely browned.

Notes:

  • The heads of escarole I had were on the small side, probably equivalent to one very large head.
  • Next time, I’ll be usiing a lot more chopped hot peppers. The balance between the peppadews and my friend’s homemade pickled Italian hots was nice when I tasted it, but I just needed more of both.
Sunday, April 10, 2016

Roasted Red Bell Pepper & Tomato Sauce with Sausage

  This hearty sauce takes some time, both in the prep - roasting bell peppers and a head of garlic - and the cooking- it simmers for a good 4 hours, but it's worth every minute spent on it. The house fills with such wonderful smells, you almost don't want to wait for it to finish, but you'll be rewarded when you do. The end result is a hearty, thick, rich and meaty sauce, perfect as a base for lasagna, baked ziti, or if you're eschewing carbs, it's lovely over a bowl of spiralized zucchini (zoodles!), the filling for pepperoni pizza bites (see below), or even just by itself in a bowl, topped judiciously with cheese.

Roasted Red Bell Pepper & Tomato Sauce with Sausage


Ingredients:

  • 2 red bell peppers
  • 1 head of garlic
  • olive oil
  • 8 0z bulk Italian sausage
  • 2 large onions, chopped
  • 3 large cloves garlic, minced
  • 4 tablespoons tomato paste
  • 1 cup red wine
  • 1 28-oz can of crushed tomatoes
  • 1 smaller can, 15 oz, diced tomatoes
  • dried oregano
  • dried basil

Directions:

  1. Pre-heat oven to 400 F.
  2. First, prep the red bell peppers and garlic for roasting:
    • Slice across the top of the garlic, cutting off a flat spot on the top to expose the cloves. Place in a ramekin and drizzle with olive oil.
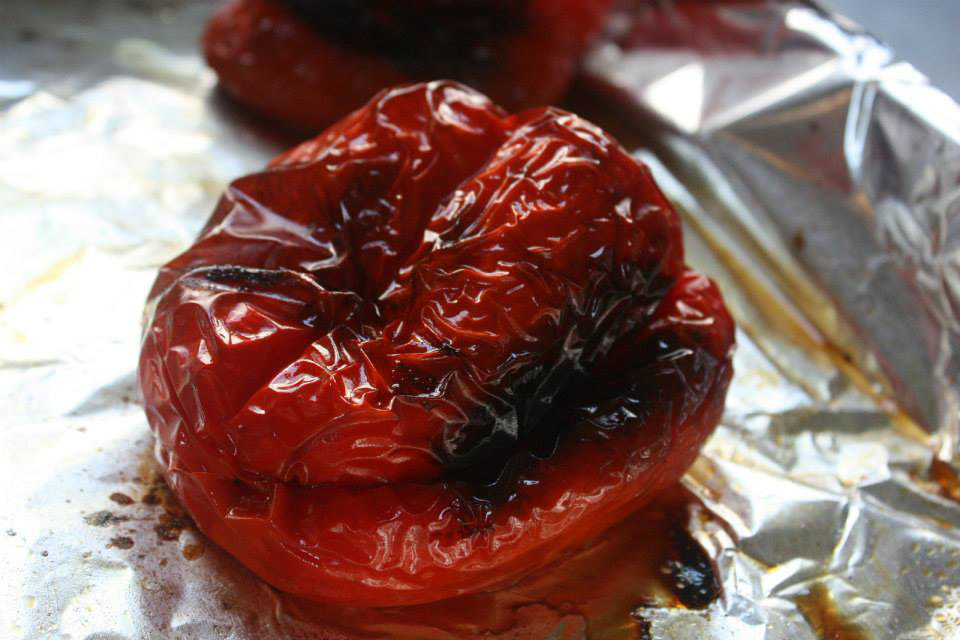
    • Place the red bell peppers in a baking dish and drizzle a little olive oil over then. Turn a few times to coat. Place the garlic and bell peppers in the oven to roast. Turn the bell peppers every 20 minutes, removing them when all 4 sides are evenly charred. The garlic comes out when the top is browned, about 40 minutes.
    • Place the bell peppers in a brown paper bag, tightly fold down the top, and place the in a bowl to let them steam. one cooled, the skins should peel off easily. Scrape away the seeds and discard them, then chop the flesh of the peppers. Set aside.
    • When the garlic is cool enough to handle, separate the cloves and squeeze the roasted garlic into a bowl, and set aside.
  3. Brown the bulk sausage in olive oil, chopping well with the blade of the spatula.
  4. Once nicely browned, add the chopped onion and cook until the onion is soft and translucent. add the garlic and saute another 5 minutes.
  5. Dissolve the tomato paste in the red wine, then pour the mixture in the skillet. Stir well.
  6. Add the crushed tomatoes and diced tomatoes, bring to a boil, then reduce heat to low, cover, and let simmer for 2 hours, stirring occasionally to ensure that it doesn't bur on the bottom.
  7. Add the chopped roasted bell pepper and garlic, stir through, cover and let simmer another 2 hours.
  8. Add some salt, dried oregano, dried basil, taste to adjust seasoning. If the sauce seems too thick, you can add a little water if needed. Cover and let simmer for another hour.
  9. Taste once again and make the final adjustment for seasoning, and you're ready to serve with pasta, on zucchini noodles, shiratake noodles, or even by itself.
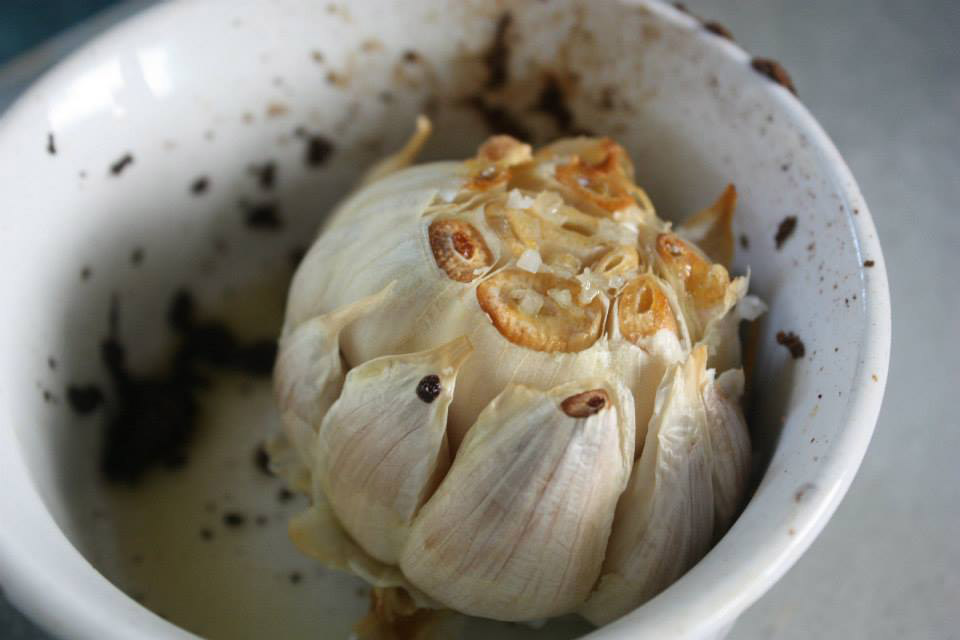
And now for some pictures! Beautiful, charred, roasted red bell peppers: roasted bell A head of roasted garlic, fresh out of the oven: roasted garlic
Thursday, April 7, 2016

Spicy Beef and Greens

Well, I'm back from the abyss of full-time work - though I'm still working full-time, I just hadn't been motivated to blog all that much. I've been crazy-busy with life's huge changes, and things have finally settled down to a routine of sorts.

I'm back to low-carbing, and to that end, I wanted to post some of my favorite staple meals that make low-carbing tasty and enjoyable. I very often make a Meat-n-Greens meal, switching out the protein - ground beef, ground turkey, chicken sausage, and the greens - spinach, kale, Swiss chard, and messing around the the flavor profiles - Asian, Cajun, Mediterranean. The end result is a great-tasting, satiating, fiber-rich meal, and it's easy, too, so that's a winner. There are no exotic, hard-to-fnd ingredients, so really, anyone could make it.

Spicy Beef and Greens


Ingredients:

  • 1/4 lb ground beef
  • 1/2 onion, chopped
  • 1/2 green bell pepper, chopped
  • 1/2 cup mushrooms, chopped
  • 1 clove garlic, smashed and minced
  • 1/2 t ginger paste
  • 1/2 t red chili paste
  • 1/2 cup beef stock
  • water as needed
  • splash soy sauce
  • 2 cups packed greens, chopped
  • cayenne

Directions:

  1. Over medium-high heat, saute the beef until brown.
  2. Add the chopped onion and cook until it begins to soften.
  3. Add the bell pepper, let cook for 2 minutes.
  4. Add the chopped mushrooms and cook until they’ve released a lot  of liquid and are starting to brown up.
  5. Add the garlic, ginger paste and chili paste. Stir through, then add the beef stock and a few splashes of soy sauce.
  6. Add the chopped greens on top, cover and cook until they are darker green and nicely wilted. You can add more water as needed to help steam.
  7. Remove the cover, stir thoroughly, add some cayenne and let cook until most of the liquid has evaporated.

Notes:

  • I sometimes buy ginger paste  and chili paste in a  tube for ease of convenience. Also this beef broth concentrate. I don’t always have my homemade beef stock on hand, and a squirt oor two of this stuff is great.

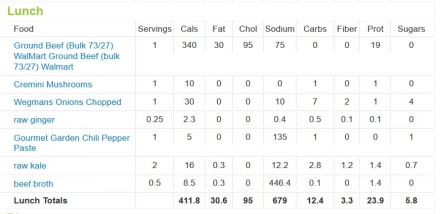
Calorie Breakdown:

Ok, by eyeballing and guessing at the amounts, this is the calorie breakdown for this meal.
This assumes that the nutrient breakdown in the Livestrong database is accurate:

spicy beef and greens cals.jpg

Thursday, December 27, 2012

Khachapuri

I have many food memories associated with my travels overseas; some quite fond, others not as much - there's nothing like a bout of food poisoning overseas to put the stamp of "Never Again" on a certain food! Thankfully, the good food memories far outweigh the unpleasant ones.

I was first introduced to Georgian food when I was studying abroad in the USSR in 1990 at a restaurant in Moscow called, if I recall correctly, Kavkaz. We sat around a long table and were treated to a small version of a legendary Georgian feast - small, but we were there for several hours and ploughed through many bottles of Georgian wine.

Although I enjoyed all of the dishes, especially the Chicken Satsivi, my favorite was the platter of Khachapuri which they served to us as part of the appetizer course. These cheese-filled boat-shaped breads had come straight from the brick oven and were viciously, piping hot, but we fell on them, ripping them apart and enjoying the stringy, gooey mixture of Georgian cheeses, most likely sulguni and imeruli.

I've always wanted to recreate it at home, but never got around to it until yesterday as I was snowed in by this winter storm. I knew there was no way I'd find the special cheeses without a trip into Brooklyn's Brighton Beach, "Little Odessa," so I did the next best thing: I improvised, and with pretty tasty results.


Khachapuri


Ingredients:
For the dough:
  • ½ cup warm water (check your package or jar of yeast for the correct temperature range)*
  • pinch of sugar
  • ½ teaspoon dry yeast
  • 1¼ - 1½ cups all purpose flour
  • ½ teaspoon salt
  • ¾ tablespoon olive oil
For the filing:

  • 6 ounces fresh mozzarella, crumbled
  • 4 ounces shallot and chive Boursin (herbed goat cheese is also good, about 3 ounces)
  • Approximately 1 tablespoon chopped fresh herbs - I like thyme and oregano
  • 1 teaspoon granulated garlic

  • Cornmeal for dusting
  • Sea salt and cool water for glazing


Directions:

  1. Place the warm water, sugar and yeast in a bowl and let sit until the yeast is foamy and has "bloomed," about 5 minutes. Add ½ cup of flour and stir to incorporate well. Add the salt, olive oil and stir well. Add enough of the remaining flour and stir until the dough starts to pull away from the sides of the bowl and form a rough ball.
  2. Turn the dough out onto a lightly floured surface and knead until smooth and elastic, about 8 minutes. Place the ball of dough in an oiled bowl, turning to coat evenly. Cover with plastic wrap and set in a warm place to rise, about an hour or until doubled in size.
  3. Preheat the oven to 450 and prepare a cookie sheet by lining it with parchment paper and sprinkling it with cornmeal. Mix together the filling ingredients and set aside.
  4. Once the dough has risen to twice its original size, lightly sprinkle your work space with more cornmeal. Punch the dough to release the gas and turn it out onto the cornmeal. Flatten the dough into an oblong, slightly oval shape. Mound the cheese filling on the dough, leaving a 1-inch border of dough along the edges.
  5. Fold the edges over to make a thick rim. The bread should look somewhat like a boat.
  6. Bake in a preheated oven for 12 - 15 minutes, until the bread has started to brown on the edges and the cheese is nice and melty.
  7. Serve immediately.

Related Posts with Thumbnails